Lab 3.1 - Configure the CI/CD pipeline up to production
Level: 3 Release Manager
Time: ~75 min
You will: turn a two-stage pipeline into a four-stage one that reaches production, give every stage its org and a credential a real project can live with, and publish all of it the way every change reaches a major branch: through a Pull Request.
The situation
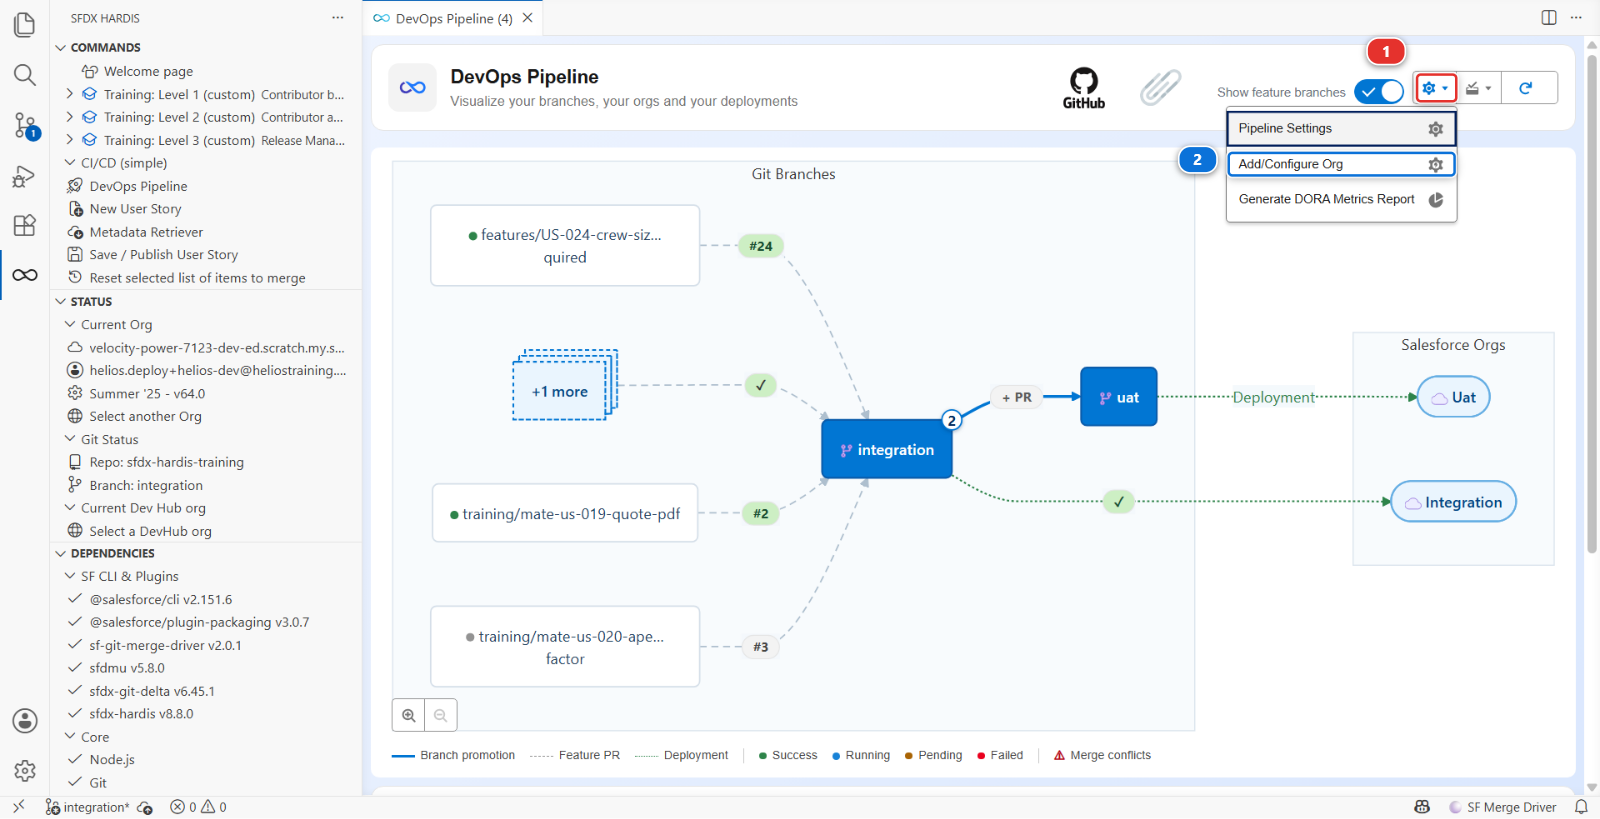
Open the DevOps Pipeline panel and look at what Victor left.
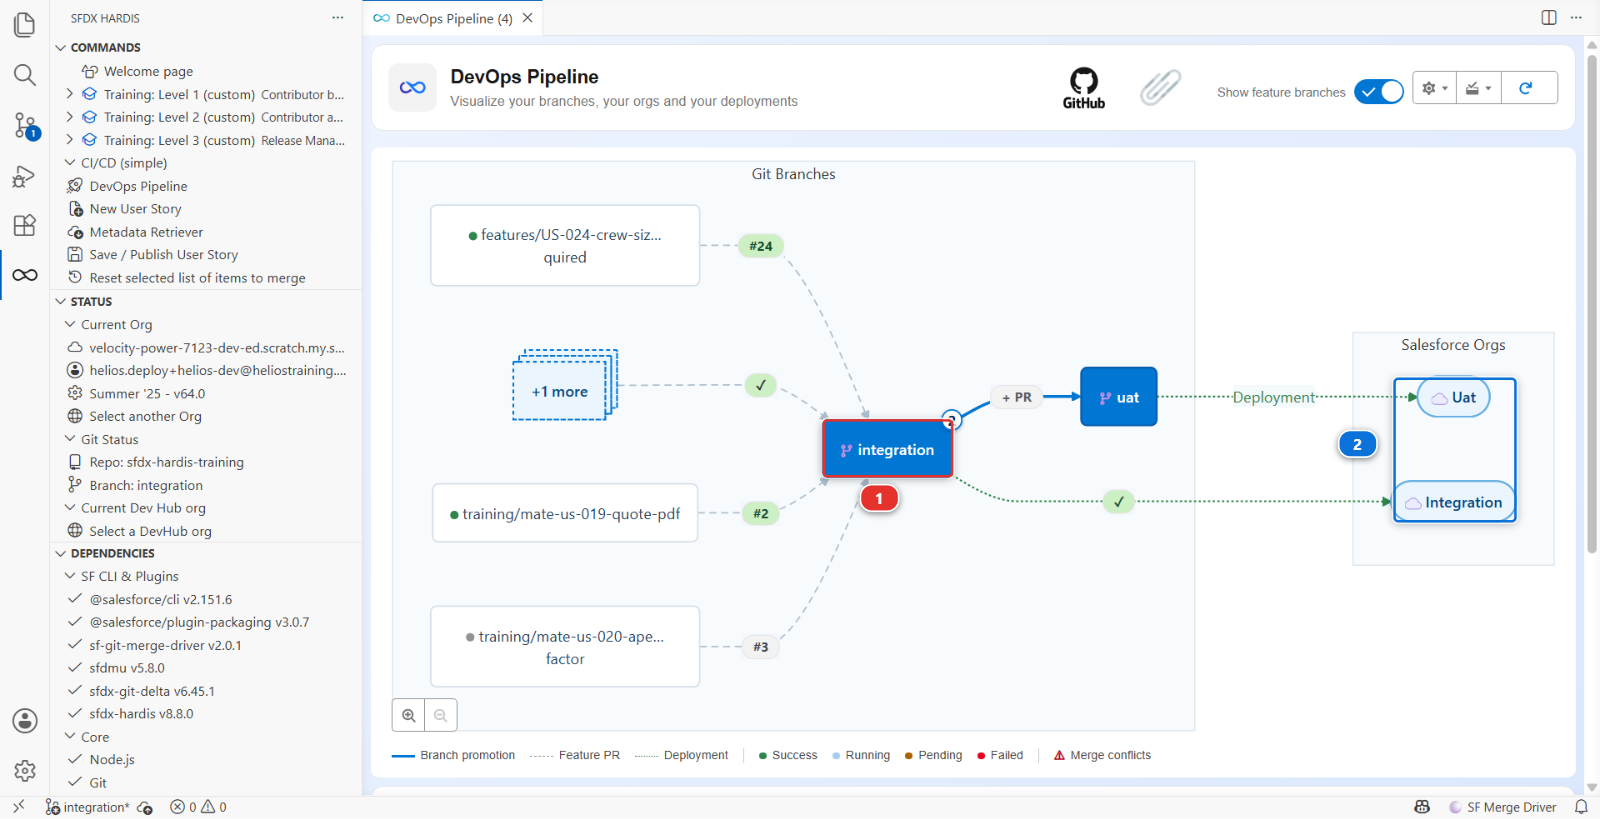
integration (1) and uat, each with its org (2), and the feature branches your teammates
have in flight. Work reaches the business testers, and then it stops. There is no preprod, and
main, production, is a branch nothing deploys: every release so far reached production by hand,
which is exactly the kind of release nobody can say anything about afterwards.
And the two stages that do exist reach their orgs through a shortcut. The CI logs into
helios-integration and helios-uat with SFDX_AUTH_URL_INTEGRATION and SFDX_AUTH_URL_UAT, two
secrets holding long-lived OAuth refresh tokens. Level 1 told you they were an exception for
throwaway scratch orgs. Three things are wrong with them on a real project, and somebody will ask
you why you are spending an hour on this:
- They cannot be rotated. Changing one means authenticating again, as a human, in a browser
- They are bearer credentials with no scope. Whoever reads the secret has everything that user has, from anywhere, until it is revoked
- They are tied to a person. When that person leaves or their token is reset, the pipeline stops, and nobody knows why
The alternative is a JWT flow through an External Client App: a certificate you hold, a pre-authorised user, no password anywhere, and revocation by deleting one app. sfdx-hardis sets it up for you, org by org, and writes the branch configuration while it is at it.
That is your first week. None of it is unusual: most projects start with the stages they need on day one, and finishing the pipeline waits until the day somebody needs to release properly.
Before you start
- Levels 1 and 2 finished
-
helios-prodstill connected in Orgs Manager. It is the Developer Edition org you signed up for in Level 1, and the Dev Hub of your scratch orgs. From this lab on, it is also production - One more free Developer Edition org, signed up at
developer.salesforce.com/signup exactly like the
first one, and connected in Orgs Manager with the alias
helios-preprod - Both seeded: Welcome page > Training: Level 3 > Set up one of my training orgs, once
for
helios-preprodand once forhelios-prod -
helios-integrationandhelios-uatconnected in Orgs Manager, as since Level 1 - On
integrationin VS Code, with nothing waiting in the Source Control panel
The CI, not your workstation
Your own connection to these orgs already exists and is not changing: Orgs Manager keeps working exactly as before. What you set up here is how a GitHub runner, which is not you and has no browser, reaches each org.
Steps
1. Decide the shape
Four questions, and their answers are the whole pipeline:
| Question | Helios answer |
|---|---|
| Which branches are major, meaning they have an org and a deployment job? | integration, uat, preprod, main |
| Which branch can merge into which? | integration into uat, uat into preprod, preprod into main. Nothing skips one |
| Which branch is production? | main |
| Where does an urgent fix start? | From preprod, so it never carries the work still waiting in integration and uat |
If you cannot state them in one sentence each, configuring them will not help.
preprod earns its place in two ways. It is the last rehearsal before production, an org that holds
what production holds and that nobody works in, so a release that deploys there cleanly has very few
surprises left. And it is where hotfixes start, which Lab 3.7 is about.
The order of this lab follows from one rule: a branch has to exist before an org can be attached to it. So the branches come first, then their protection, then their orgs.
2. Create the preprod branch
main already exists: it is the default branch of every fork. preprod does not, and it starts
from main, because it holds what production holds.
In your fork (your own copy of the course repository on GitHub, for example
github.com/my-username/sfdx-hardis-training), open the Branches page: the branch count next to
the branch selector, or github.com/my-username/sfdx-hardis-training/branches. Click New branch
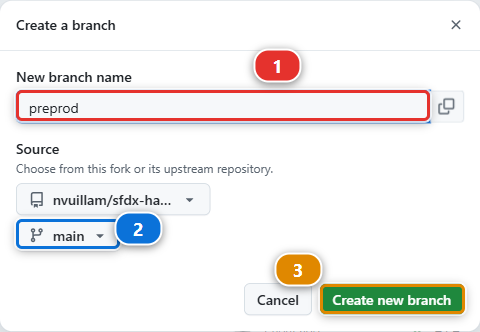
at the top right. Type preprod as the name (1), leave the source on your fork and main
(2), and click Create new branch (3).
Then tell VS Code: in the Source Control panel, ... menu, Pull, Push > Fetch. The next steps list the branches of your fork, and a branch VS Code has not fetched is not in the list.
3. Protect preprod and main
From now on, nobody pushes to a major branch: not a contributor, not you. Every change reaches
integration, uat, preprod and main through a Pull Request whose checks are green, and GitHub
enforces it rather than trusting everybody to remember. Since Lab 1.2, integration and uat
work that way: setting up the environment protected them. preprod and main are yours to
protect, and a release manager does it the day the branches join the pipeline, not after the first
bad merge.
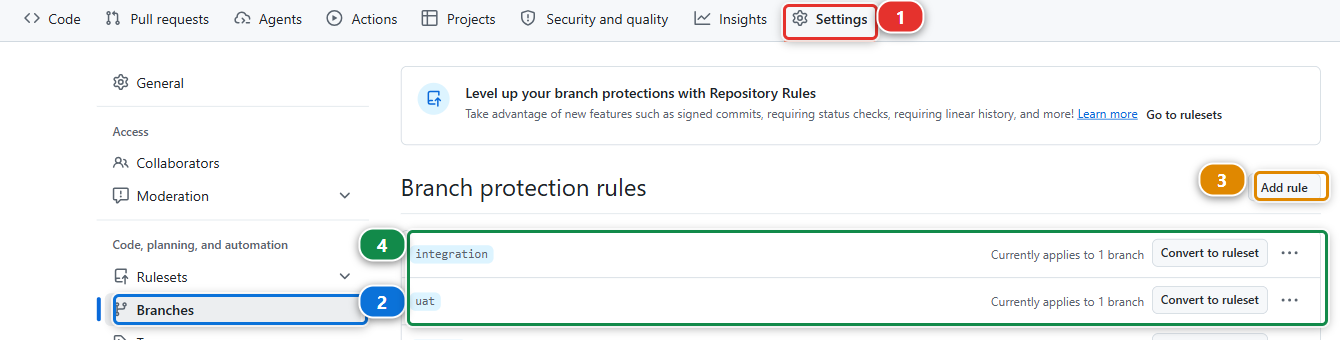
In your fork (github.com/my-username/sfdx-hardis-training), click Settings (1), then
Branches (2) in the left menu. The two rules (4) are the ones setting up your environment
created in Lab 1.2. Click Add rule (3).
The form is long, and five things on it matter. The picture is the integration rule, opened from
the list above, so it shows the values you are about to set:
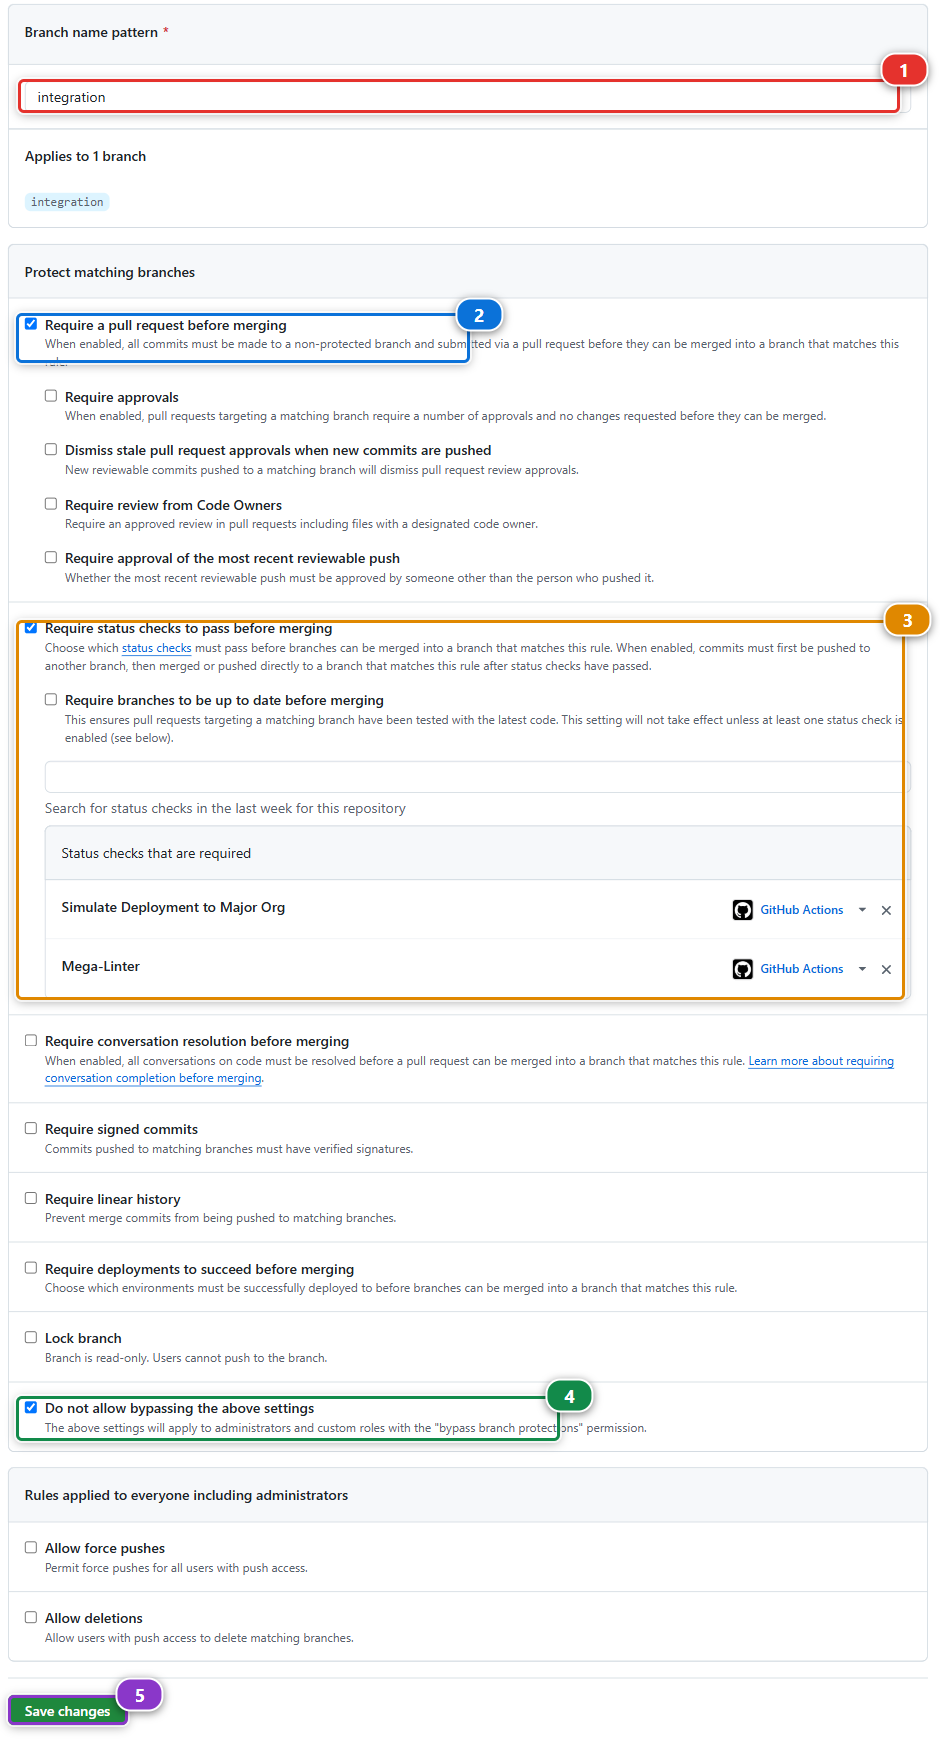
- Branch name pattern (1):
preprod - Tick Require a pull request before merging (2), and untick Require approvals under it: you work alone here, and GitHub never lets you approve your own Pull Request. On a real project, ask for one approval
- Tick Require status checks to pass before merging (3). A search box appears under it.
Type
Simulateand pick Simulate Deployment to Major Org, then typeMegaand pick Mega-Linter. Both land in Status checks that are required: they are the two checks every Pull Request of this course runs - Tick Do not allow bypassing the above settings (4). Without it, the owner of the repository, you, still gets a checkbox to push or merge anyway
- Click Create at the bottom. On an existing rule the same button reads Save changes (5)
Then Add rule again, for main, with the same settings. Back on the list: four rules,
integration, uat, preprod and main.
The search box only suggests checks that ran on this repository in the last seven days. Both ran on
your Level 2 Pull Requests, so they are there unless you took a long break: in that case open any
Pull Request into integration first, and its checks put them back in the list.
Under the hood: what the rule enforces
A required check is matched by its job name, not by the workflow file. Simulate Deployment to
Major Org is the job of .github/workflows/check-deploy.yml, which runs on every Pull Request into
the four major branches. Mega-Linter is the job of .github/workflows/megalinter.yml, which runs
on every push, so on the last commit of every Pull Request opened from a branch of your fork.
A workflow that only runs when some files change, like link-check.yml here, must never be
required: a Pull Request that does not touch those files waits for it forever, and GitHub shows it
as Expected, never as failed.
The same rule, set through the GitHub API, is what Set up my training environment did for
integration and uat:
gh api -X PUT repos/<your-handle>/sfdx-hardis-training/branches/preprod/protection \
  -F "required_pull_request_reviews[required_approving_review_count]=0" \
  -f "required_status_checks[contexts][]=Simulate Deployment to Major Org" \
  -f "required_status_checks[contexts][]=Mega-Linter" \
  -F "required_status_checks[strict]=false" -F enforce_admins=true -F restrictions=null
strict=false is a choice: true would also require every Pull Request to be up to date with its
target before merging, which on a busy integration means updating every open branch after every
merge. GitLab, Azure DevOps and Bitbucket have the same settings under other names: protected
branches, branch policies, merge checks.
4. Configure integration and its org: Add/Configure Org
Now the orgs. One command does it all for a branch: it writes the branch configuration, the org it
deploys to and the branch it merges into, creates the credential the CI logs in with, and deploys the
External Client App into the org. You run it once per major branch, starting with integration.
In the DevOps Pipeline panel, click the gear (1) at the top right and choose Add/Configure Org (2).
The command runs in a panel and asks one question at a time (1), with the answers to click below
it (2). Here it is at the second question, with helios-integration already chosen.
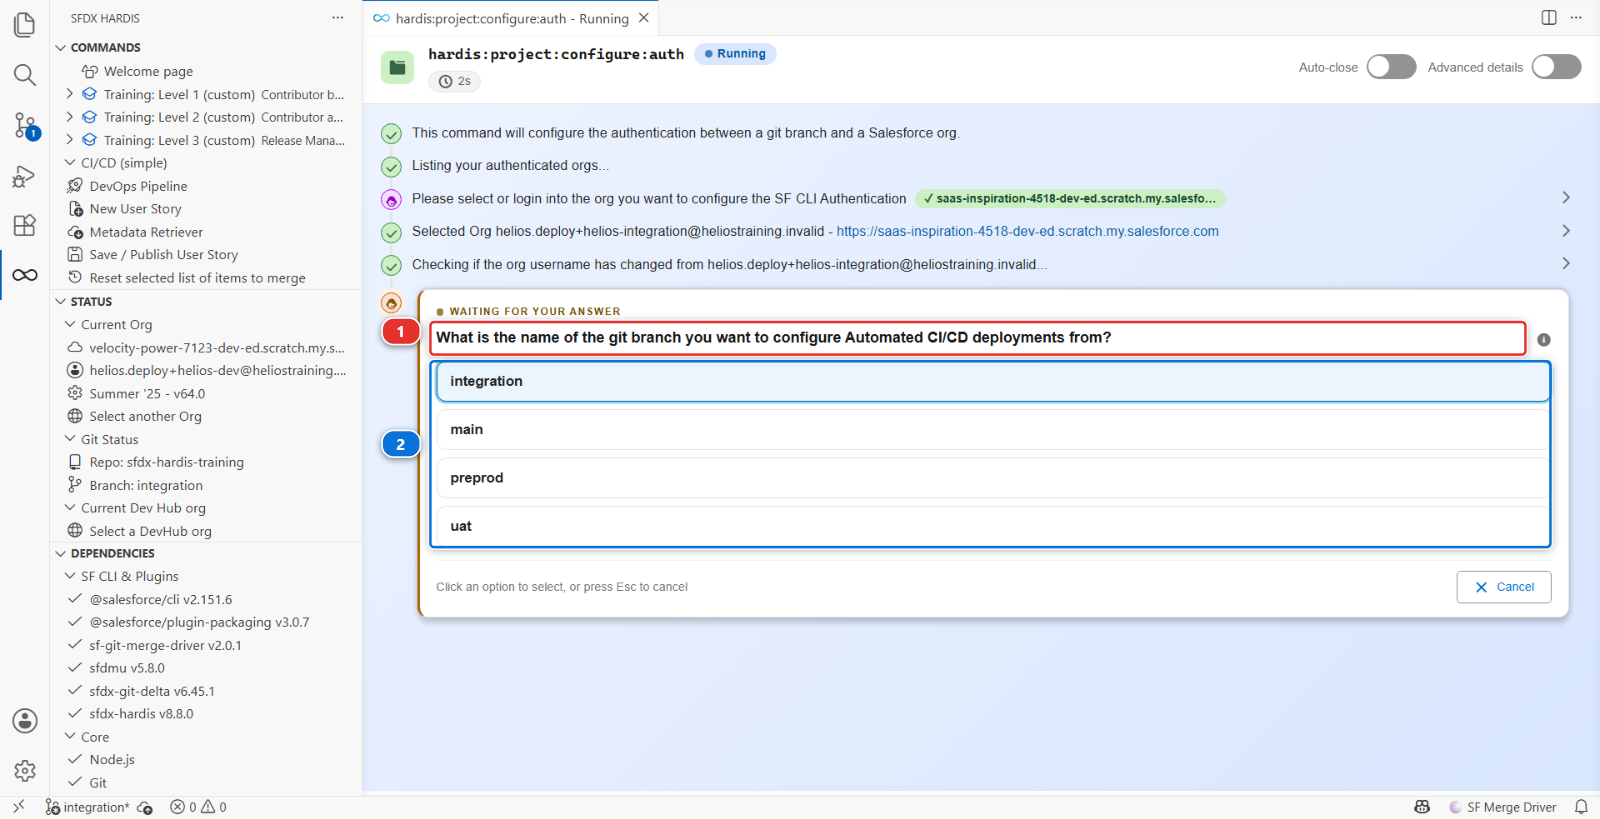
It asks a dozen questions, in this order:
- Please select or login into the org you want to configure the SF CLI Authentication -
helios-integration. The command makes it your default org and, because that changed, VS Code starts the same command again. Pickhelios-integrationa second time in the new panel and carry on from there - What is the name of the git branch you want to configure Automated CI/CD deployments from? -
integration. The list is built from the branches of your fork, and branches whose name contains a/are left out, which is why no feature branch is offered - What is the base URL or domain or the org you want to connect to, as integration related
org ? Pick 🧪 Sandbox or Scratch org (test.salesforce.com):
helios-integrationis a scratch org, and a scratch org logs in like a sandbox. The highlighted answer is the one above it, 📝 Custom login URL, so read this list rather than pressing Enter - What are the target git branches that integration will be able to merge in? -
uat. This is the merge path of step 1, written asmergeTargets - What is the Salesforce username that will be used for deployments by CI server ? - the
helios-integrationusername, which it offers you already filled in - How do you want to provide the SSL certificate? - Generate a self-signed certificate (default). The other answer, CA-signed, generates nothing and only prints instructions
- Do you want sfdx-hardis to configure the SF CLI External Client App or Connected App on your org ? - yes
- Which JWT certificate storage mode do you want? - ClientId + decryption key as secret variables + encrypted certificate as file (default). The other mode puts the certificate itself in a third secret and deletes the file
- Please confirm when variables have been set. This one is a stop, and step 5 is what it is waiting for. Do not click Validate yet
- Then, after you confirm: the name of the External Client App, a contact email, and the
profile to pre-authorise (
System Administrator). The list shows the profile names in the language of the org's user, so an org set to French listsAdministrateur systèmeinstead
5. Store the two secrets, then let the command finish
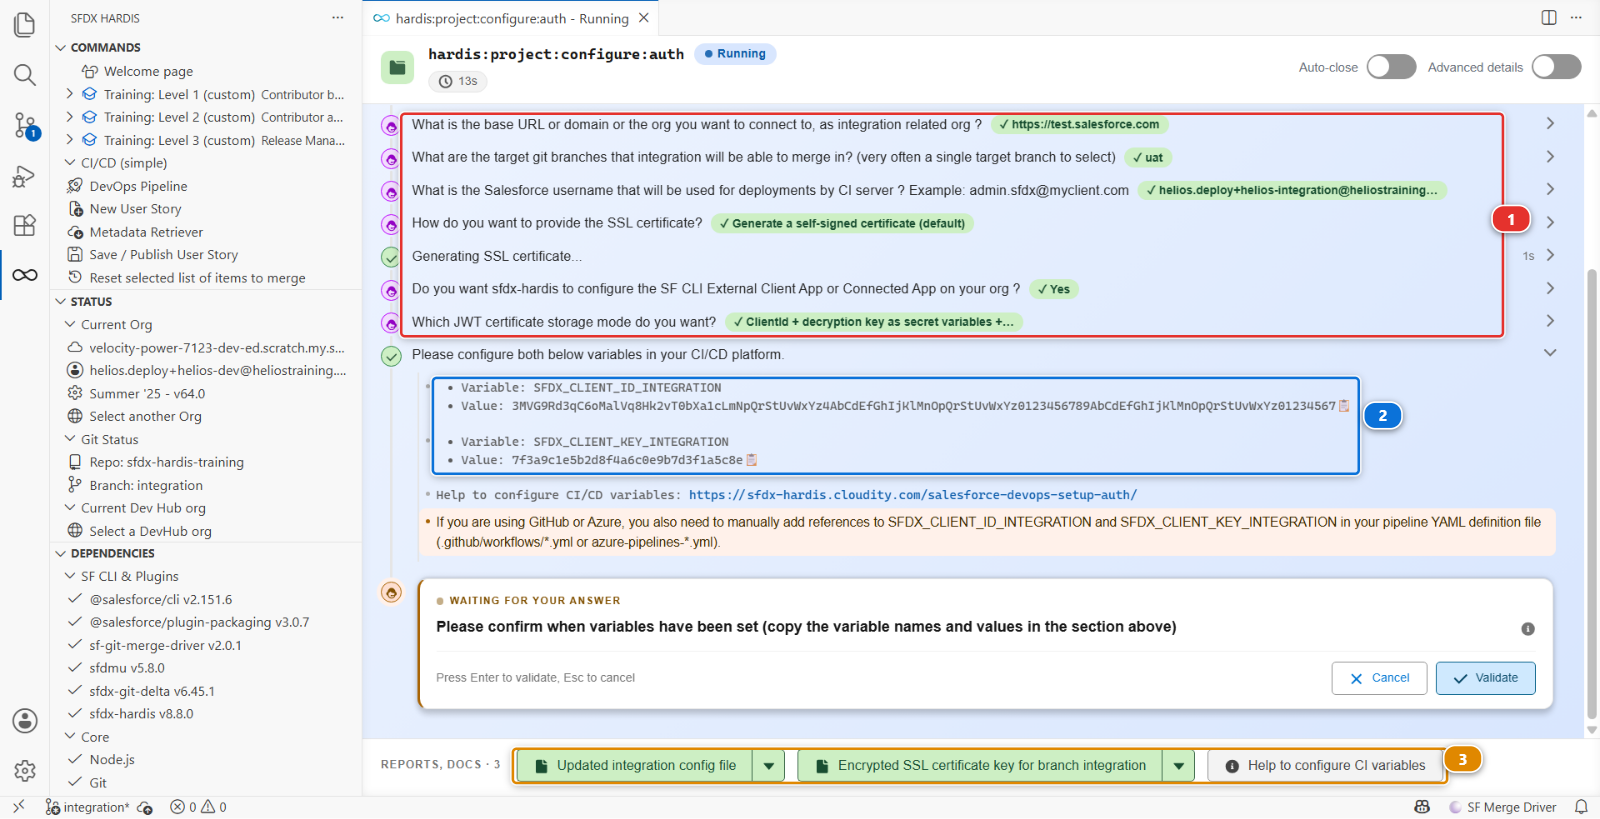
Just above question 9 the panel prints the two values the CI needs (2), each with a copy button. Nothing prints them again, so do not close the panel. The panel keeps every question you answered (1), and the files it wrote are in the reports bar at the bottom (3).
In your fork (github.com/my-username/sfdx-hardis-training), open Settings > Secrets and
variables > Actions (1), then click New repository secret (2):
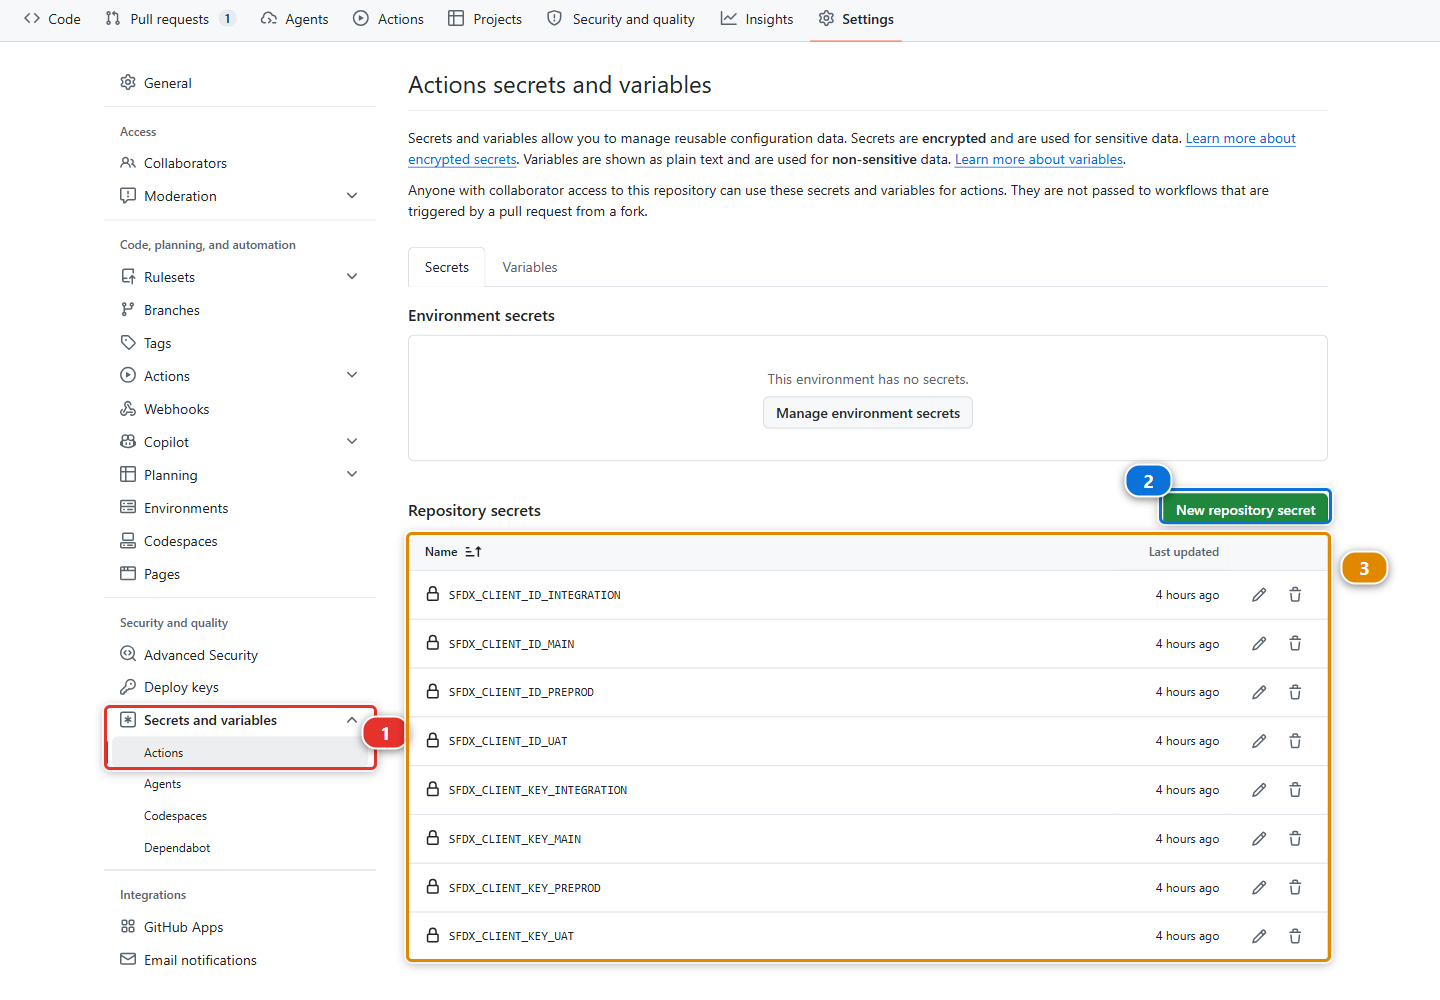
The page lists the names of the secrets the repository holds and never their values (3). Nothing, not even GitHub, can show you a stored value again. That is the whole reason the panel asks you not to close it.
Each secret is one form: the Name (1), the Secret (2) pasted from the panel, then Add secret (3). Do it twice:
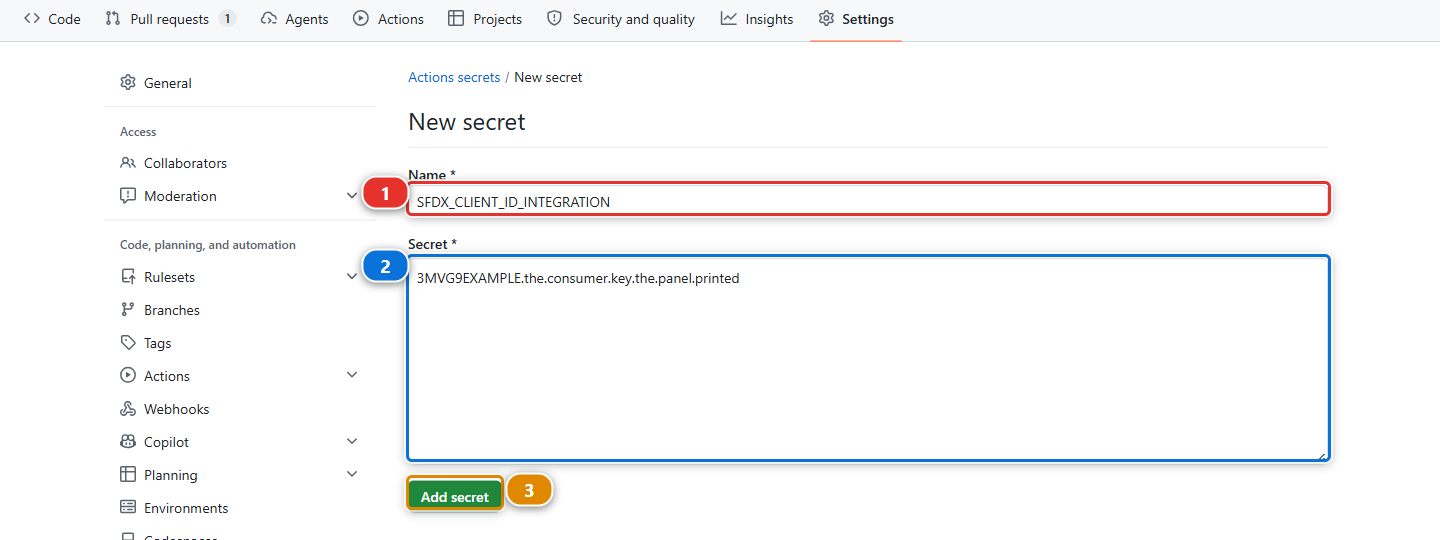
| Name | Value |
|---|---|
SFDX_CLIENT_ID_INTEGRATION |
the consumer key the command printed |
SFDX_CLIENT_KEY_INTEGRATION |
the passphrase the command printed |
The suffix is the branch name in upper case. That is the whole convention, and it is why the names are not arbitrary.
The orange warning about your pipeline YAML
Under the two values, the panel warns that on GitHub a secret also has to be passed to the job
in .github/workflows/*.yml. It is right, and it is the step people forget: a secret GitHub
holds and the workflow never reads is a secret the job does not have. This course's workflows
already pass all eight, SFDX_CLIENT_ID_* and SFDX_CLIENT_KEY_*, for the four branches. Open
.github/workflows/process-deploy.yml and read its env: block once, because on your own
project that block is yours to write.
Now click Validate on question 9, answer the last three questions, and let the command create the app.
What it wrote, and where:
| What | Where | What it is |
|---|---|---|
| Branch configuration | config/branches/.sfdx-hardis.integration.yml |
targetUsername, instanceUrl and mergeTargets |
| An encrypted private key | config/branches/.jwt/integration.key |
The credential itself, meant to be committed |
| A certificate | integration.crt in your home directory, deleted after the app deploys |
What is uploaded into the org |
| An External Client App definition | deployed into the org by the command | What Salesforce authenticates against |
| Two values to store as secrets | printed in the command panel | SFDX_CLIENT_ID_INTEGRATION and SFDX_CLIENT_KEY_INTEGRATION |
The private key is encrypted, with a passphrase the command generates at random and that only your secret holds. The repository alone is not enough to authenticate, which is what makes committing the key acceptable.
6. Check the authorisation it did for you
The step everybody warns you about, pre-authorising the app, is the one the command already did:
the External Client App it deploys carries Admin approved users are pre-authorized and the profile
you named at the last question. Look at it once, so you know where it is when it matters.
In helios-integration: Setup > External Client App Manager, open the app, whose name defaulted
to sfdxhardisintegration, then Policies. Permitted Users reads Admin approved users are
pre-authorized, and the profile is listed.
It matters because of the one path where it is not done for you: if the app deployment fails and
the command falls back to printing manual instructions, those instructions stop at uploading the
certificate. Follow them literally and the first CI login fails with user hasn't approved this
consumer, an accurate message that reads like a bug.
7. The same for uat, preprod and main
Same gear, Add/Configure Org, three more times, one per branch and its org:
| Branch | Org | Base URL answer | Merges into | Secrets |
|---|---|---|---|---|
uat |
helios-uat |
🧪 Sandbox or Scratch org (test.salesforce.com) | preprod |
SFDX_CLIENT_ID_UAT, SFDX_CLIENT_KEY_UAT |
preprod |
helios-preprod |
☢️ Other: Dev org, Production org or DevHub org (login.salesforce.com) | main |
SFDX_CLIENT_ID_PREPROD, SFDX_CLIENT_KEY_PREPROD |
main |
helios-prod |
☢️ Other: Dev org, Production org or DevHub org (login.salesforce.com) | tick nothing | SFDX_CLIENT_ID_MAIN, SFDX_CLIENT_KEY_MAIN |
Check the org twice for main: pointing production at the wrong org is the single most expensive
mistake available in this lab. preprod and main are Developer Edition orgs, which log in the way
production does, and only scratch orgs and sandboxes use test.salesforce.com.
Eight secrets, four External Client Apps, four keys. Tedious once, then never again.
8. Let contributors start a hotfix
Contributors choose where a User Story goes from a list, and preprod is not in it yet.
Open the DevOps Pipeline panel, the gear menu, Pipeline Settings. The page title reads Global Pipeline Settings, and the scope selector (1) reads Global Settings.
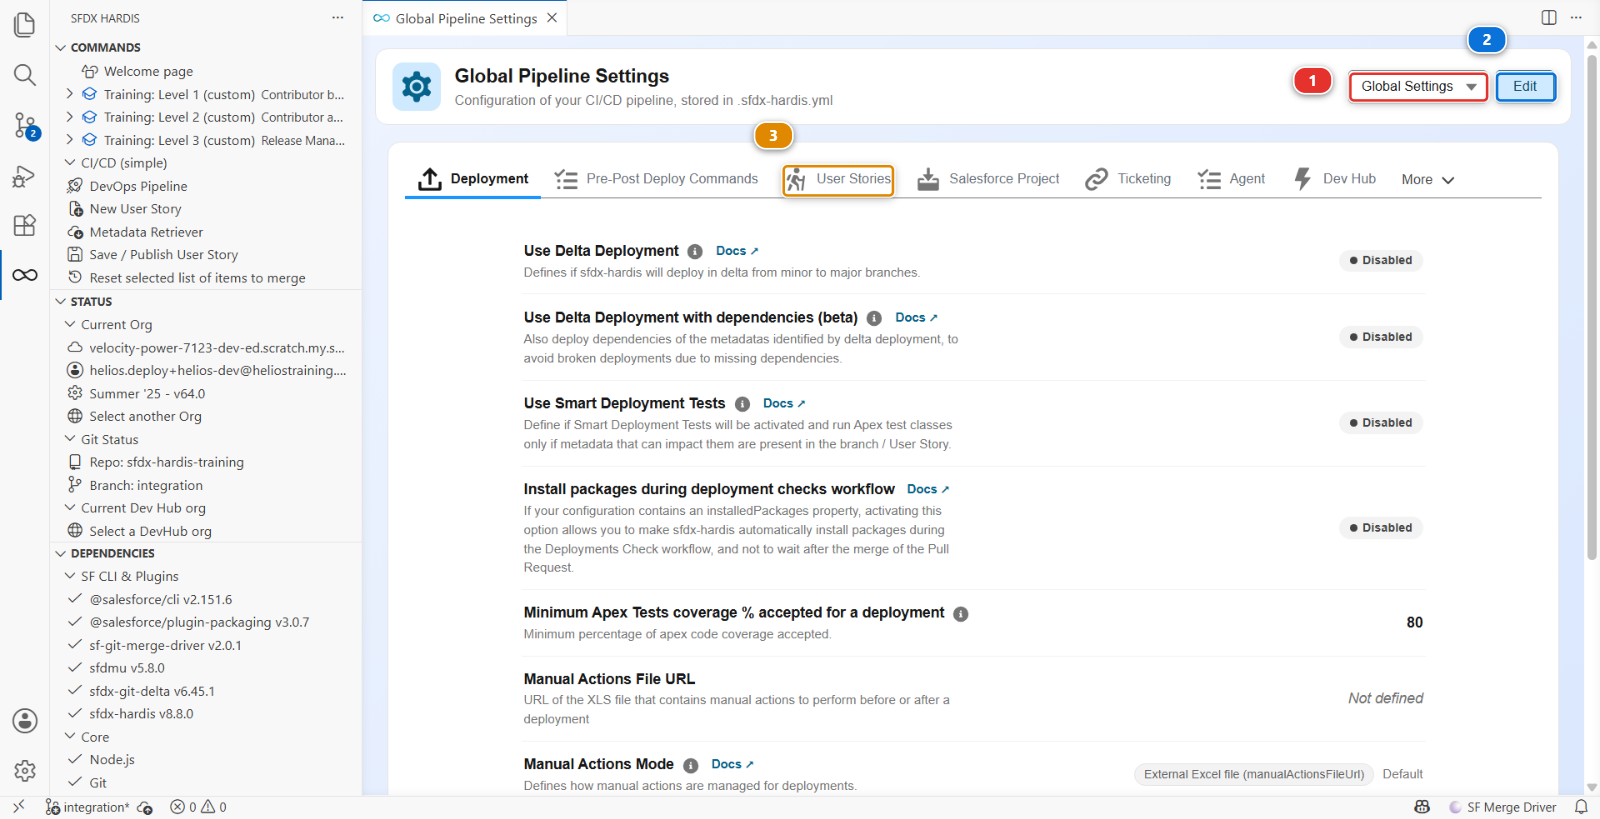
Click Edit (2), then the User Stories tab (3).
Two fields matter, and they are two separate text boxes, one value per line: Available PR/MR target branches (1) and Labels for available PR/MR target branches (2). Nothing pairs them except their order, so line 2 of one belongs to line 2 of the other.
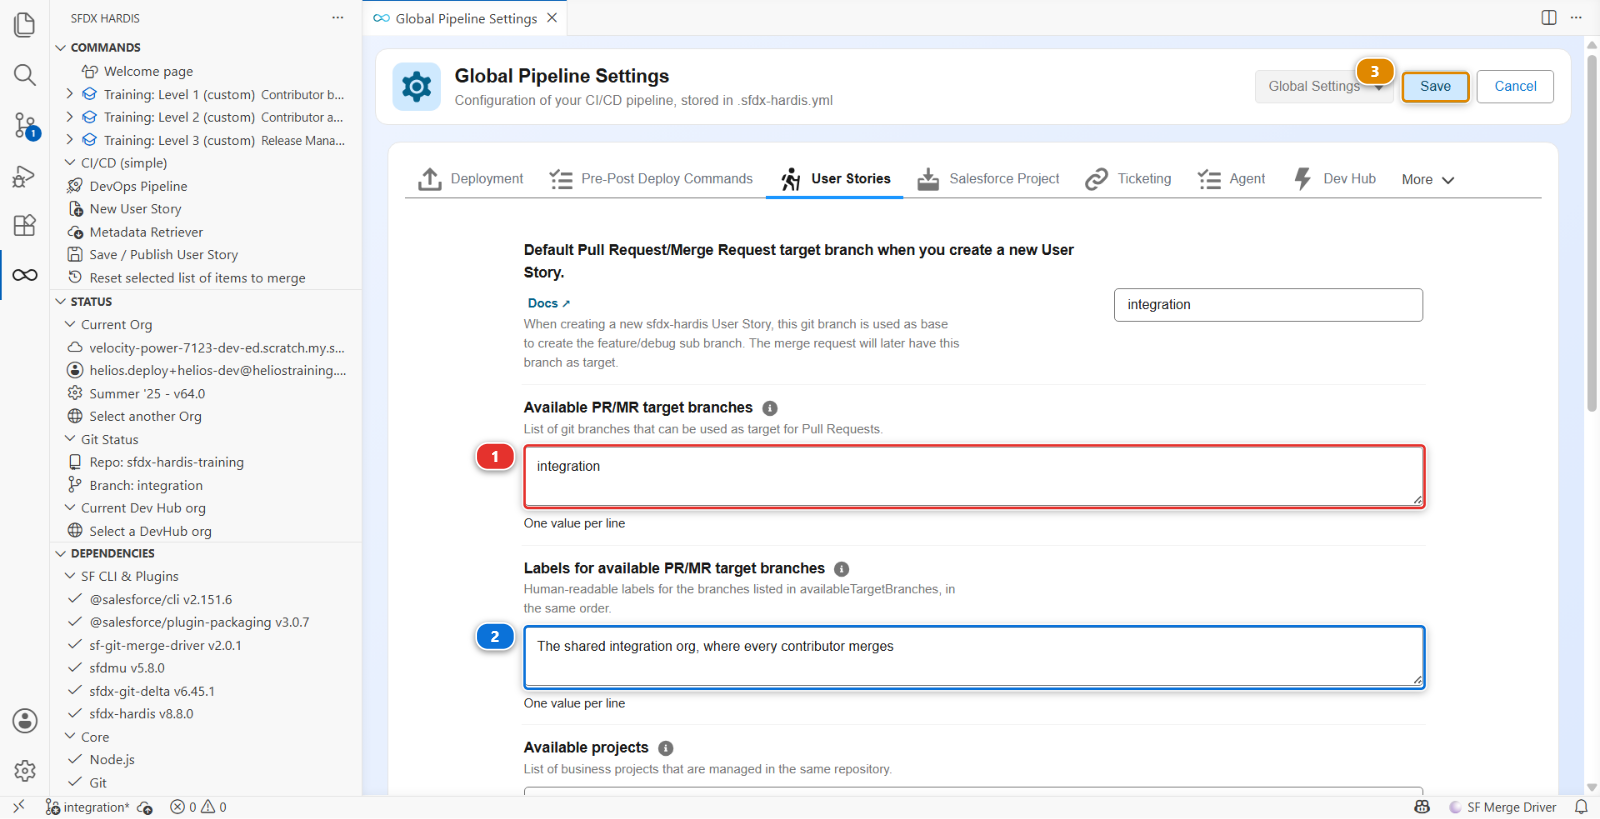
Today each holds a single line, the one a contributor has been choosing since Level 1. Add a second line to each, in the same position:
| Line | Branch | Label |
|---|---|---|
| 1 | integration | The shared integration org, where every contributor merges |
| 2 | preprod | Hotfixes on the production version, agreed with the release manager |
uat and main are not in that list, on purpose. Nobody builds a User Story against them: work
reaches uat by promotion from integration, and main by promotion from preprod.
Save (3).
Looking for the production branch?
productionBranch has no field in the settings panel, and this project already carries it:
productionBranch: main, in the Pipeline block of config/.sfdx-hardis.yml. A panel that
covers most of a configuration and not all of it is normal, and it is why the under the hood
sections of this course keep showing you the file.
9. Tell the panel what the project now uses
config/.sfdx-hardis.yml carries orgAuthenticationMode: secretsOnly, put there when the course
handed you the auth URL shortcut. It tells the DevOps Pipeline panel not to look for certificate key
files, and not to warn you when there are none. There are keys now, so that line is a lie, and a
panel told a lie stops being able to warn you.
Still in Pipeline Settings, scope Global Settings (1), open the Deployment tab (2).
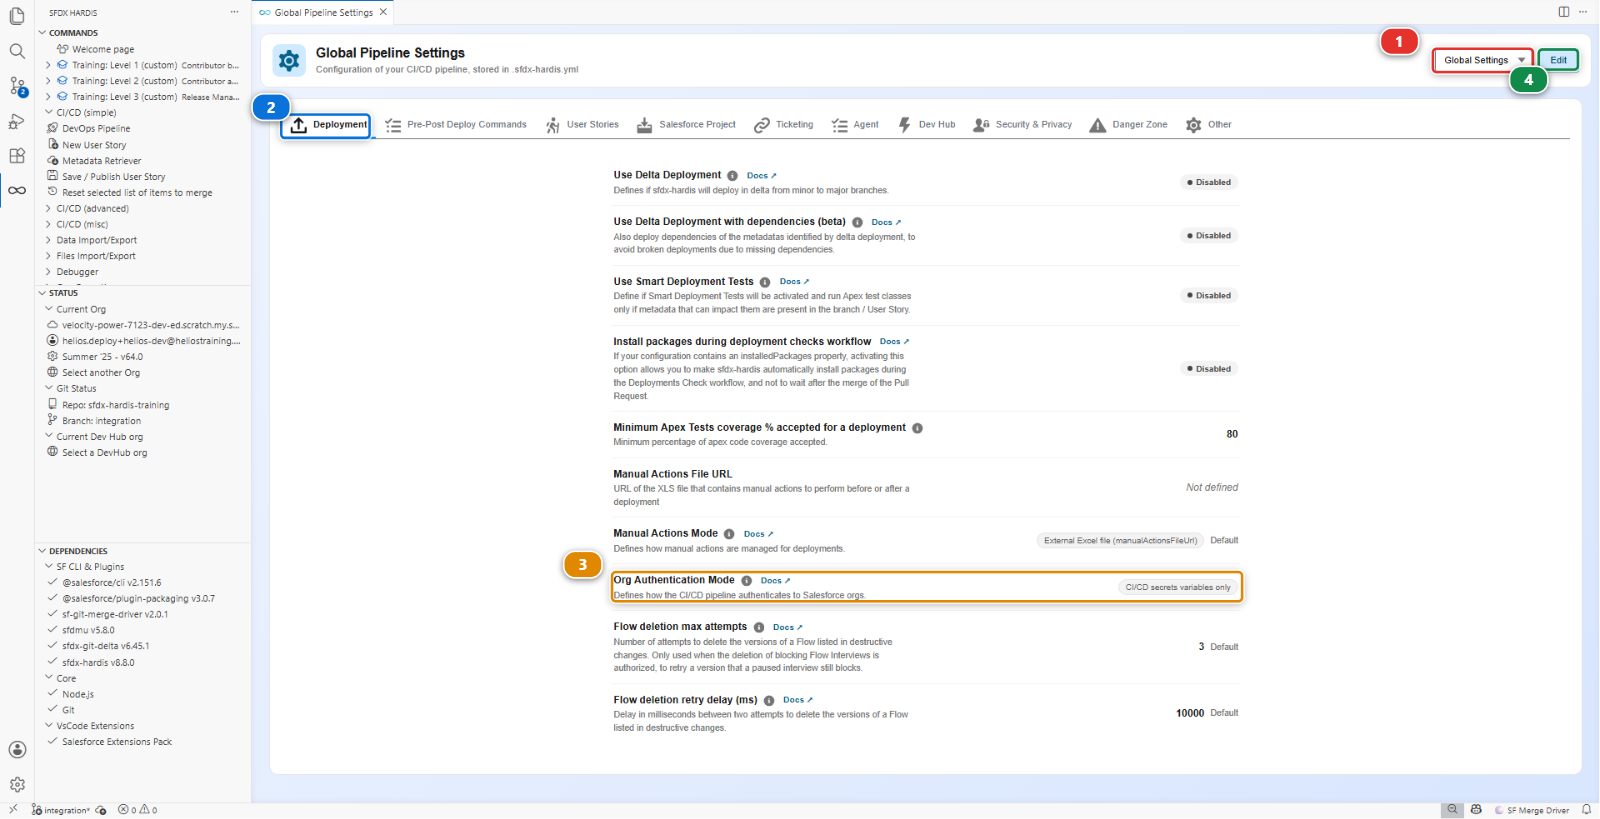
Org Authentication Mode (3) reads CI/CD secrets variables only. Click Edit (4),
change it to Encrypted certificate key files, and Save. From now on the panel checks
config/branches/.jwt/<branch>.key for every major branch and says so when one is missing.
10. Delete the shortcut, before anything proves anything
In your fork (github.com/my-username/sfdx-hardis-training): Settings > Secrets and variables >
Actions, find SFDX_AUTH_URL_INTEGRATION and SFDX_AUTH_URL_UAT, and delete both.
Do it now, before you publish. The authentication step of every job looks for
SFDX_AUTH_URL_<BRANCH> first and stops there when it finds one. While the two secrets exist, a
green job proves nothing about your keys: it logged in the old way. Once they are gone, the only way
in is the JWT one, so the next green job is the proof.
11. Publish the configuration through a Pull Request
Everything you did is files on your disk, on integration: the four branch files, the four keys,
the target branches and the authentication mode. They reach integration the way every change
does, through a Pull Request with green checks. The protection of step 3 would refuse anything else.
You publish them the way you published a User Story in Level 1, with the same two buttons.
Put them on a branch of their own. Your changes are sitting on integration, which accepts
nothing directly. Ctrl+Shift+P, Git: Create Branch..., and name it
config/pipeline-up-to-production. VS Code carries the uncommitted files across with you, so
nothing is lost and nothing is on integration any more.
Commit them. In the Source Control panel, stage the configuration files and commit them as
Configure the pipeline up to production, exactly as you staged metadata in Lab 1.5.
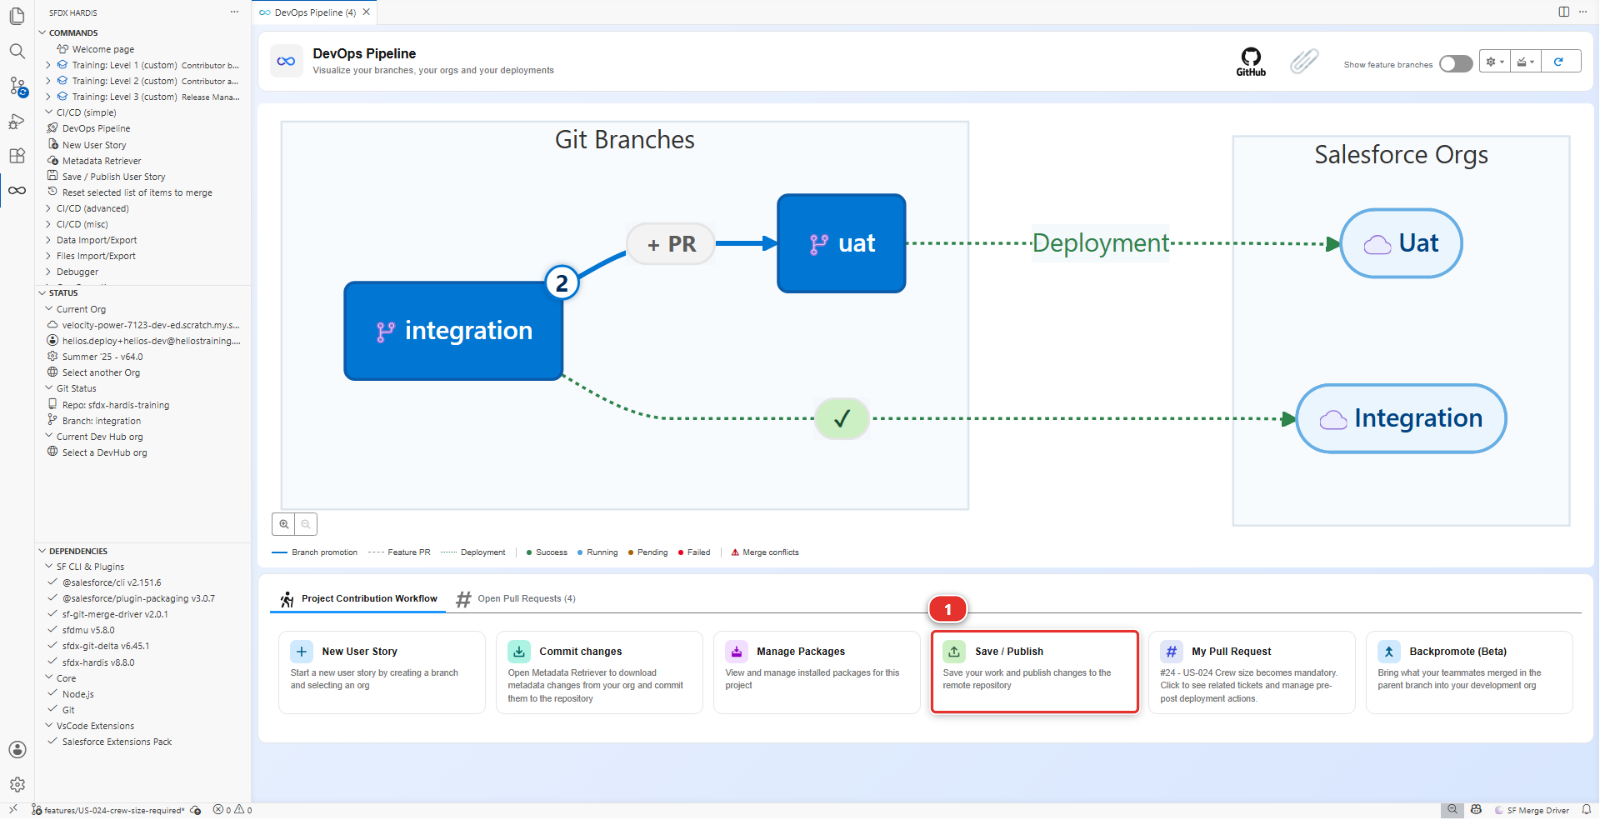
Publish. In the DevOps Pipeline panel, click the Save / Publish card (1), the one
every story has gone through since Lab 1.5. It asks the target branch: integration. It commits
what is left, runs the cleaning, and pushes the branch.
Open the Pull Request. When it finishes, the actions bar along the bottom starts with Create
Pull Request (1). Click it: the extension opens GitHub on the Pull Request page for this
branch, already pointing at integration.
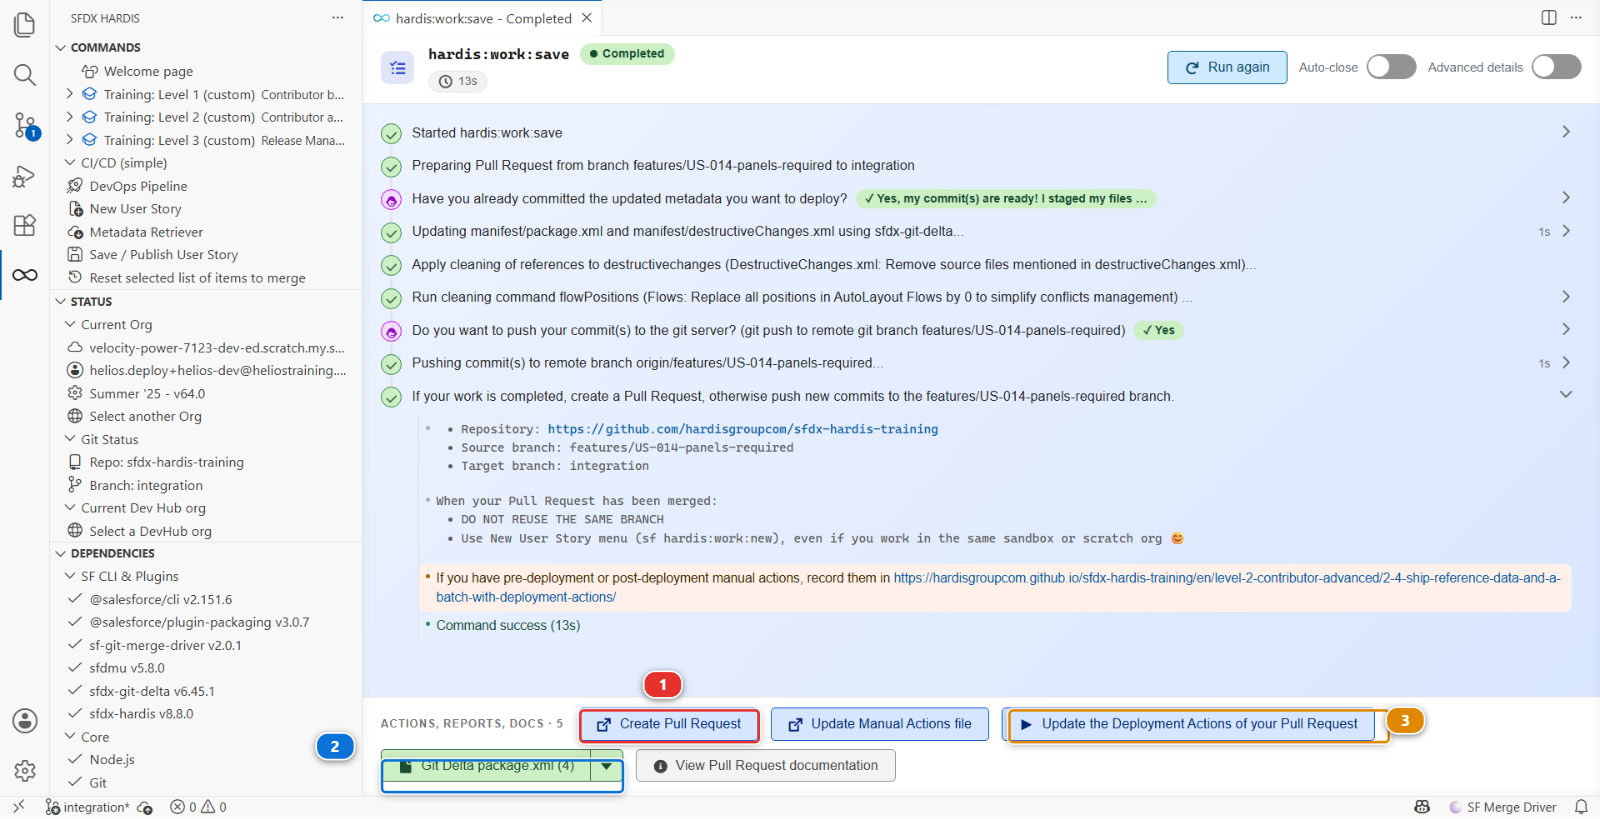
The same bar carries the package.xml the command generated (2) and the deployment actions of
this Pull Request (3), as in Lab 1.6. This branch changes no metadata, so both are short.
The shortcut this course keeps for later
Training: Level 3 > Publish my pipeline configuration does all of the above in one click: branch, commit, push, Pull Request. Labs 3.5 and 3.8 use it, now that you have seen what it stands for. A real project has no such menu entry, which is why this lab does it by hand.
Open the Pull Request in your fork. Its Simulate Deployment to Major Org check logs into
helios-integration with no auth URL secret left to use: open it from Checks, expand Login &
Process Deployment, and look for sf org login jwt. That line and a green check are your key
working.
When both checks are green, merge with Merge pull request, not with a squash: this is not a
feature, and the configuration has to travel to uat, preprod and main with the promotions,
commit for commit (Lab 1.6). Then Pull in the Source Control panel: your integration gets
the configuration back, merged.
uat, preprod and main prove their keys the first time a Pull Request goes into them: the
promotion to uat in Lab 3.5, then preprod and main in Lab 3.6.
Under the hood: what the JWT flow actually does
The command ran:
sf hardis:project:configure:auth
and every CI job now runs, before anything else:
sf org login jwt \
--client-id $SFDX_CLIENT_ID_INTEGRATION \
--jwt-key-file <decrypted key> \
--username <targetUsername from the branch config> \
--instance-url <instanceUrl from the branch config> \
--alias integration
The private key is decrypted at the start of the job with SFDX_CLIENT_KEY_INTEGRATION, used, and
never written anywhere persistent.
How the authentication hook chooses. For a branch <B>, it looks for SFDX_AUTH_URL_<B> first,
in that spelling and then upper-cased. If it finds one, it uses it and returns, before the JWT
variables are even read. Only if there is none does it go on to SFDX_CLIENT_ID_<B> plus the key.
That order is why step 10 comes before publishing.
The JWT lookup also accepts a plain SFDX_CLIENT_ID with no suffix, as a last resort and with a
warning in the log: a single unsuffixed secret left over from an old setup answers for every branch.
orgAuthenticationMode is not written by this command, and no CLI command reads it. It only
tells the VS Code pipeline panel which shape to expect: secretsOnly means the credentials live
entirely in CI secrets, encryptedCert, the default, means every major branch has a key committed.
Under the hood: the files you just published
config/.sfdx-hardis.yml gained:
availableTargetBranches:
- integration
- preprod
availableTargetBranchesLabels:
- "The shared integration org, where every contributor merges"
- "Hotfixes on the production version, agreed with the release manager"
orgAuthenticationMode: encryptedCert
and config/branches/ now holds four files, each with targetUsername, instanceUrl and
mergeTargets, plus a .jwt folder with four encrypted keys.
A major branch is not declared anywhere as "major". It becomes one by having a branch
configuration file with an org in it. That is the whole mechanism, and knowing it means you can read
any sfdx-hardis project in two minutes by listing config/branches/. Every screen that reads major
branches, the pipeline diagram and the scope selector of Pipeline Settings included, is reading that
folder.
sf hardis:project:create would have generated the skeleton of a new project: the workflows for
every git provider, .mega-linter.yml, projectName, developmentBranch and autoCleanTypes. It
writes no config/branches/ file and asks for no org but the Dev Hub: the branch files are
Add/Configure Org's job, as above. The command that takes an existing org with no repository at all
and produces the first commit is sf hardis:org:retrieve:sources:dx, the real starting point of
most projects.
12. Look at the diagram again
Open the DevOps Pipeline panel and click Refresh. This is the pipeline you built:
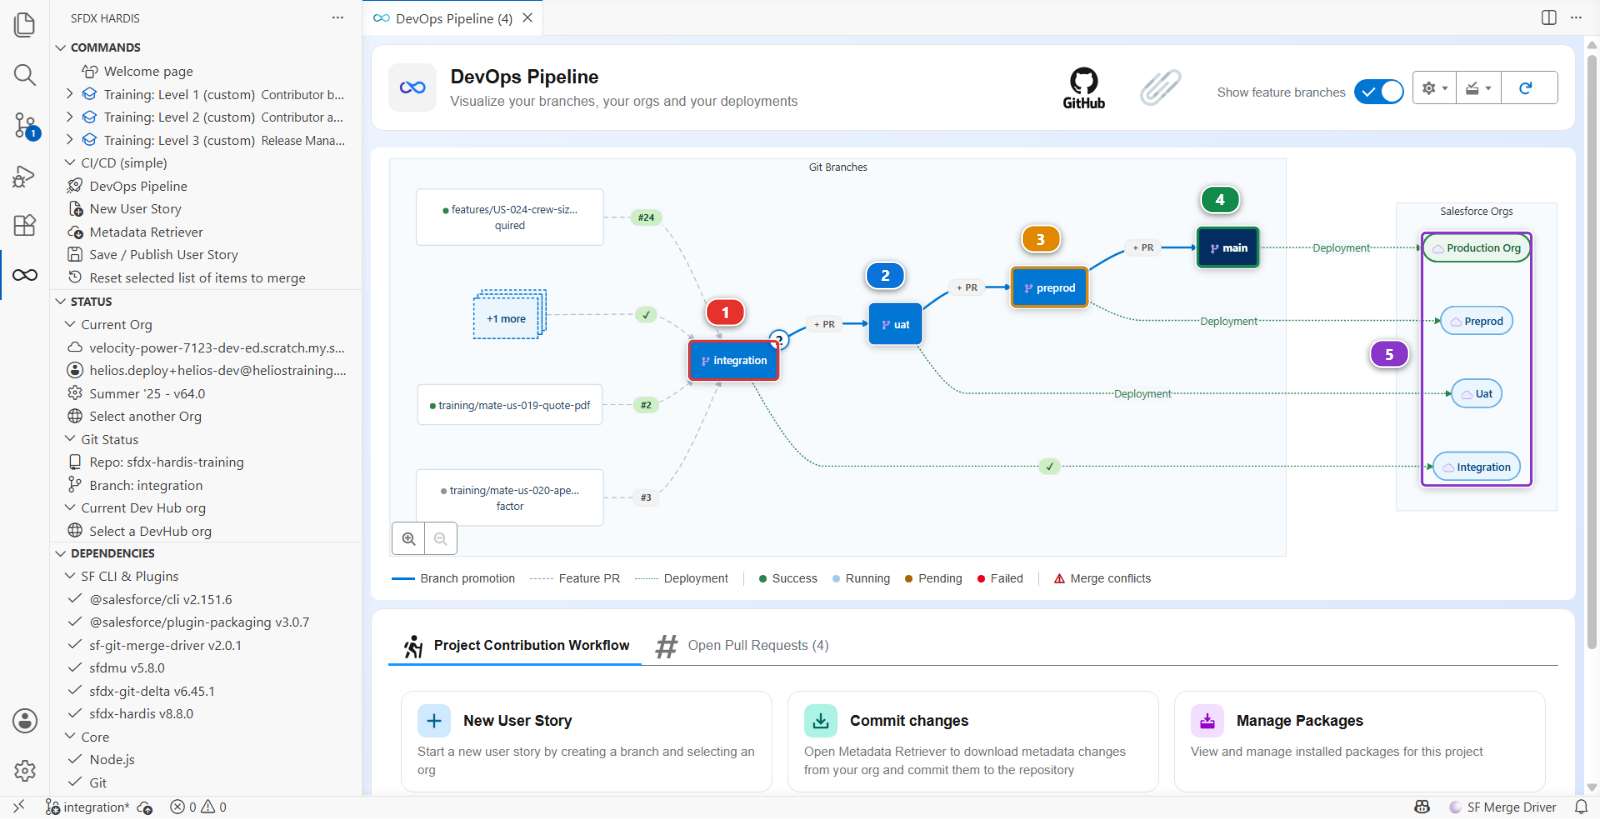
integration(1), where contributors merge, with the promotion arrow leaving ituat(2), where the business signs offpreprod(3), the rehearsal of production, and where hotfixes startmain(4), production- The four orgs (5), one per branch, in the order the work travels through them
That diagram is now the truth about this project, and the thing you point at when a stakeholder asks "so where is it". The + PR buttons on the arrows are the promotion Pull Requests, and Lab 3.5 is the first time you click one.
What you should see
- Four branch protection rules in Settings > Branches of your fork,
integration,uat,preprodandmain, each requiring a Pull Request and the two checks config/branches/onintegrationholding four files and four.jwt/*.keyfiles- Eight secrets in your fork, none of them an auth URL
- Your configuration Pull Request merged into
integration, withsf org login jwtin the log of its check - The DevOps Pipeline panel with four columns and no warning about a missing key
If it goes wrong
preprod is not in the branch list of Add/Configure Org. VS Code has not fetched it. Source Control panel, ... menu, Pull, Push > Fetch, then run the command again.
The org list offers a helios- org that no longer exists.
It happens when a scratch org expired and Set up my training environment built a new one under
the same alias: the command lists the orgs from a cache, and the cache still holds the old one.
Picking it makes the command stop straight after "Selected Org", with none of the questions asked.
The last answer of the list is the way out: 😱 I already authenticated my org but I don't see it !
clears that cache. Then run Add/Configure Org again and the list is right.
The preprod column appears with no org.
The branch file was written for another branch name. Check config/branches/ for a typo: the file
name has to match the branch exactly.
user hasn't approved this consumer.
Step 6: the External Client App exists but the user is not pre-authorised.
invalid_grant: audience is invalid.
The instance URL does not match the org type: https://test.salesforce.com for a scratch org,
https://login.salesforce.com for a Developer Edition org. Check the branch file of the job that
failed.
The job cannot decrypt the key.
SFDX_CLIENT_KEY_<BRANCH> is wrong or was copied with a trailing newline. Recreate it.
client identifier invalid.
The External Client App behind that consumer key was never created: the command stopped after it
printed the two values. Run Add/Configure Org again for that branch, store the two new values,
and publish again.
Everything passes even with the JWT secrets missing. An auth URL secret is still there and still winning. Step 10.
Save / Publish has nothing to publish, or the branch could not be created.
You are still on integration: create the branch first, with Git: Create Branch.... If instead
a configuration file you changed was also changed on GitHub, pull in the Source Control panel,
then publish again.
The check you want to require is not suggested.
GitHub only lists checks that reported on this repository in the last seven days. Open a Pull
Request into integration, let its checks run, and come back to the rule.
Set up one of my training orgs fails on helios-prod.
The usual cause is an expired connection: reconnect it in Orgs Manager under the same alias, and
run it again.
Check your work
Welcome page > Training: Level 3 > Check my work, then pick Lab 3.1.
Go deeper
Next: Lab 3.2 - Review and merge a contributor Pull Request