Lab 1.2 - Create your Dev Hub, scratch orgs and CI/CD pipeline
Level: 1 Contributor basics
Time: ~30 min, most of it waiting
You will: sign up for one free Salesforce org, and let one command turn it into everything the course needs: three more orgs, a copy of the project, and a pipeline wired to them.
The situation
This lab is not the job, and none of it happens on a real project.
There, all of this exists before you arrive: the orgs were created by whoever set the project up, the repository has been there for years, and its pipeline has been deploying for months. You would join, open the project, and start on a ticket.
This course cannot hand you a team's environment, so it has you build a small one. You do two things by hand, sign up for an org and connect it, and one command does the rest while you read. The work starts in Lab 1.3, and everything from there on is what a real day looks like.
Before you start
- Lab 1.1 finished: the Setup panel all green
- A GitHub account
- An email address you can open
If you do not have a GitHub account
Making one takes two minutes and costs nothing. Open github.com/signup and give it an email address, a password and a username. GitHub emails you a code to confirm the address, and that is the whole of it: the free plan does everything this course needs, and it never asks for a card.
Choose the username with a little care. It becomes part of the address of everything you put
there, github.com/<your-username>/sfdx-hardis-training in a few minutes, and people do read
it. Your name, or the handle you already use elsewhere, beats anything you will want to change
later.
If you already have an account, use it. Personal or work, old or new, it makes no difference here. The one thing worth knowing about a work account: some companies restrict what their members may fork. If the fork in step 5 is refused, that is why, and a personal account gets you past it.
Steps
1. Create your Developer Edition org
Go to developer.salesforce.com/signup and sign up. It is free, it never expires while you use it, and it asks for no credit card.
The form asks for your first name, last name, job title, company and country or region, then three things that decide whether the signup goes through:
- Work email (1), a real address you can open, because the signup is confirmed by email
- the tick that accepts the Main Services Agreement (2). The tracking-pixel box under it is optional, and you can leave it alone
- Sign me up (3)
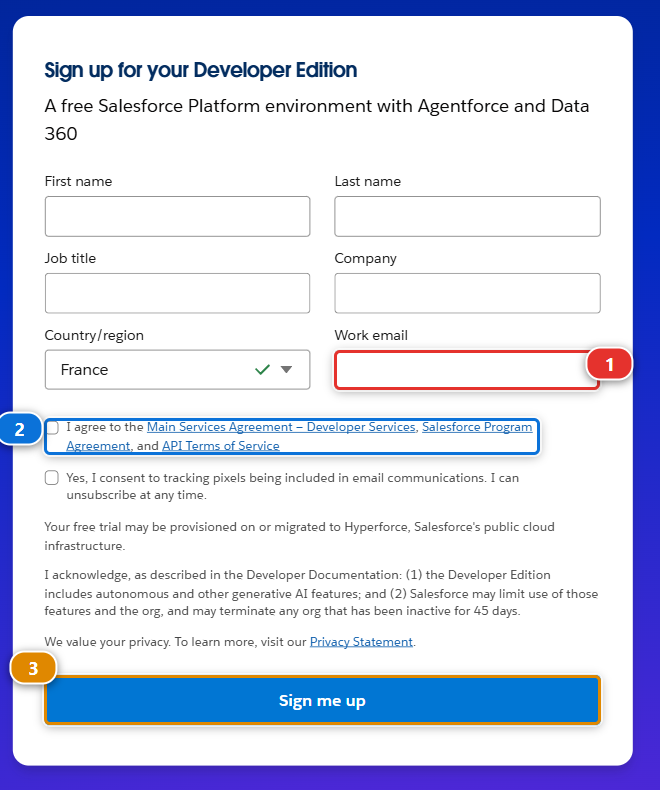
You do not choose a username: it is generated and sent to you. Open the confirmation email and set a password. The email also carries that username. It looks like an email address but it is not one, and it is what you log in with. Keep it somewhere.
This is the only org you sign up for, and it has two jobs in this course:
| When | What this org is |
|---|---|
| Levels 1 and 2 | Your Dev Hub: the org that creates the other three, and nothing else |
| Level 3 | Production, the last stop of the pipeline you will have finished by then |
Scratch orgs, in one paragraph
A scratch org is a temporary Salesforce org that a command creates in a couple of minutes, from an org called a Dev Hub. It starts empty, lives for up to 30 days, and is thrown away when you are done. Teams use them because a fresh org nobody has touched is the most honest place to test a deployment. A free Developer Edition org can act as a Dev Hub and keep three scratch orgs alive at a time, which is exactly how many this course uses.
A Developer Edition org is deactivated after a long period of inactivity. Finish a level within a few weeks and you will never meet that.
2. Connect it in Orgs Manager
Back in VS Code, on the Welcome page, click Orgs Manager.
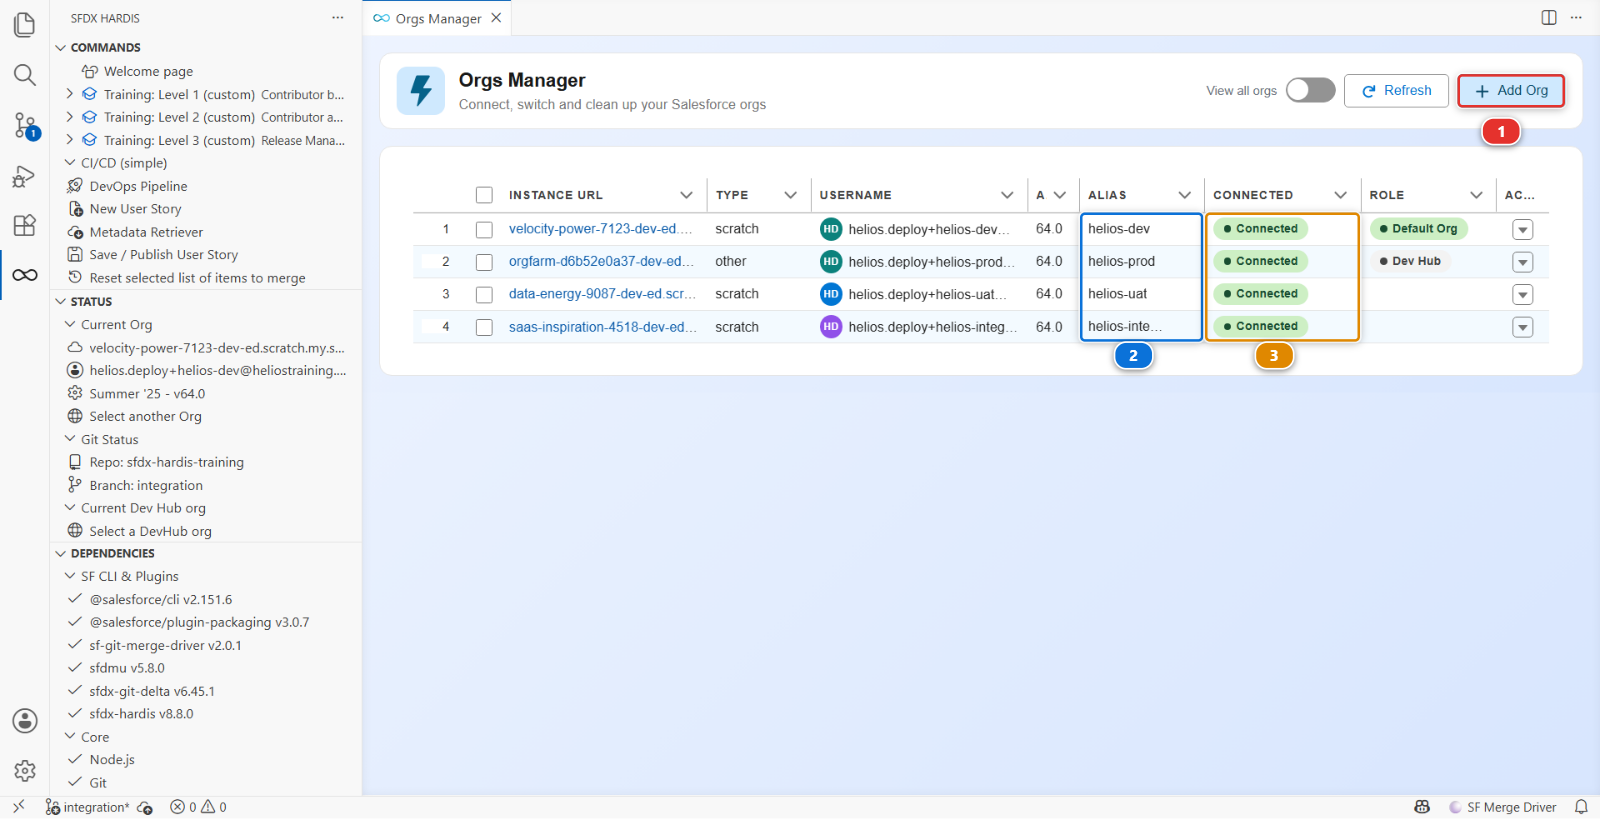
The picture was taken at the end of this lab. For now your table is empty.
- Click Add Org (1), then pick 🌍 Login to another org, the first entry in the list that opens
- It asks which address to sign in at, and it suggests the sandbox one. Change it: take ☢️ Other: Dev org, Production org or DevHub org (login.salesforce.com), because a Developer Edition org is not a sandbox. Pick the sandbox answer here and the login page refuses your username
- Your browser opens the Salesforce login page. Sign in with the username from the email, and allow access
Back in VS Code, the panel asks you one more thing:
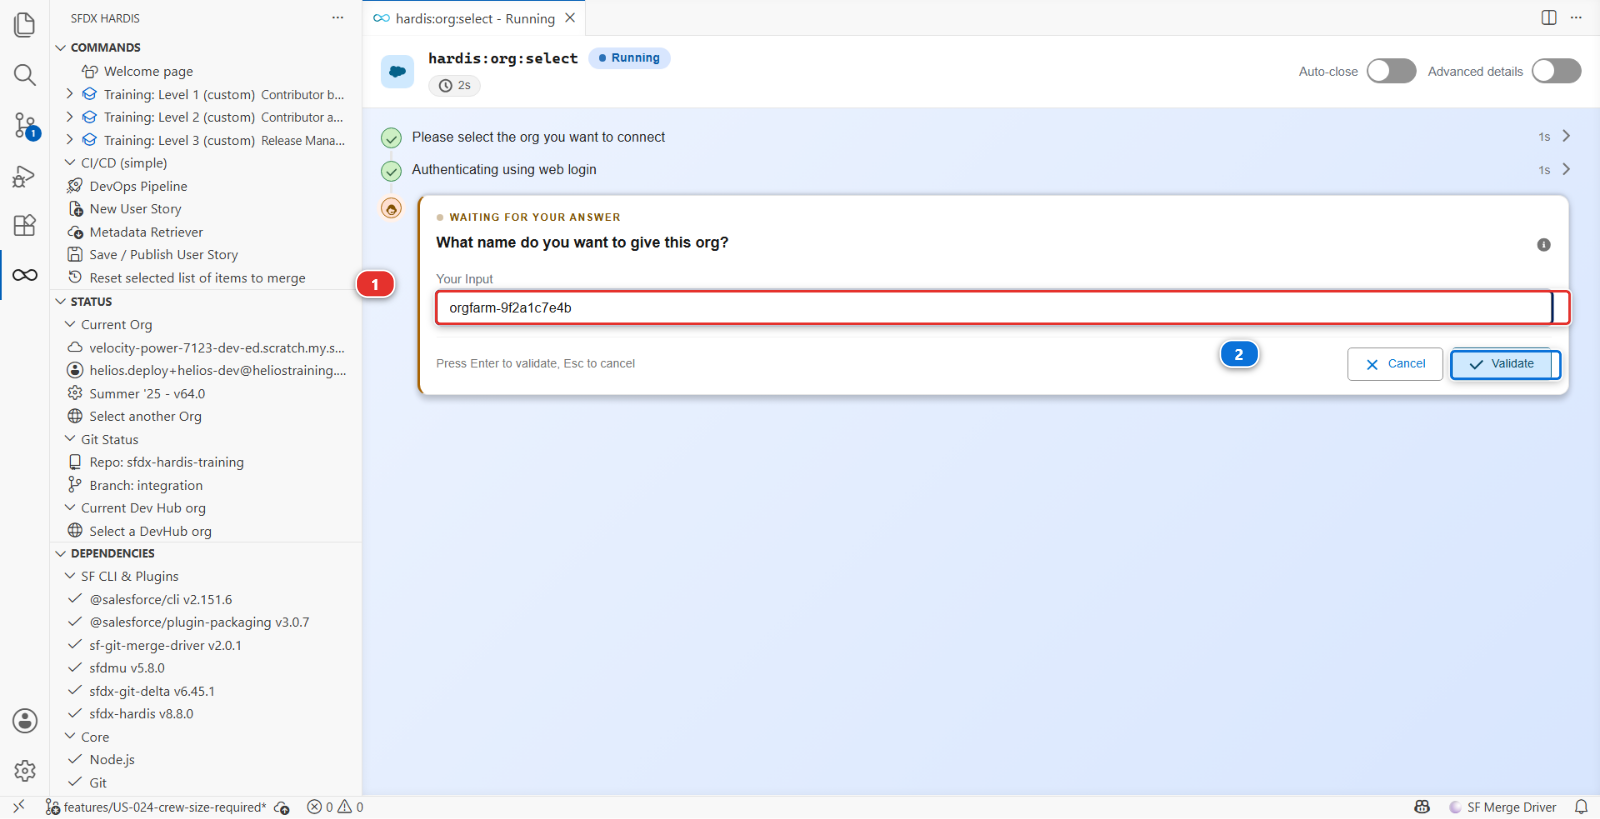
What name do you want to give this org? The box (1) is already filled with a suggestion,
taken from the org's own web address. On a Developer Edition that address is a string Salesforce
invented, orgfarm-9f2a1c7e4b or similar, which tells you nothing about what the org is for.
Replace it with helios-prod, then click Validate (2).
Production may sound like a big name for an empty org. It is the job this org has at the end of the course, and giving it its final name now means nothing gets renamed later.
That name is called an alias, and it is what you will see and click from now on: in this panel, in the pipeline diagram, everywhere the course names an org. The three orgs step 5 creates get theirs automatically, and they appear in this table under those names (2), each with a green Connected (3). This panel is how you connect to an org for the rest of the course, and also how you check which org you are pointed at, which saves more confusion than anything else in this training.
Under the hood: what connecting an org just did
The panel ran:
sf hardis:org:select
which opened your browser, let Salesforce authenticate you, and stored an OAuth refresh token in
your user profile (~/.sfdx). Nothing is stored in the project, and nothing is committed: the
credential is yours and stays on your machine. Then it named the org:
sf alias set helios-prod=you.helios@heliostraining.invalid
The alias is the name everything else uses. Every sfdx-hardis command that wants an org accepts
--target-org helios-prod from now on, and so does the Salesforce CLI itself.
3. Get the repository
You need the training project on your machine before the command in step 5 can build anything from it. Take the team's copy for now: it is read-only, and step 5 turns it into your own.
In VS Code, with no folder open, click the Source Control icon (1) in the narrow bar down the left. It offers two buttons. Take Clone Repository (2).
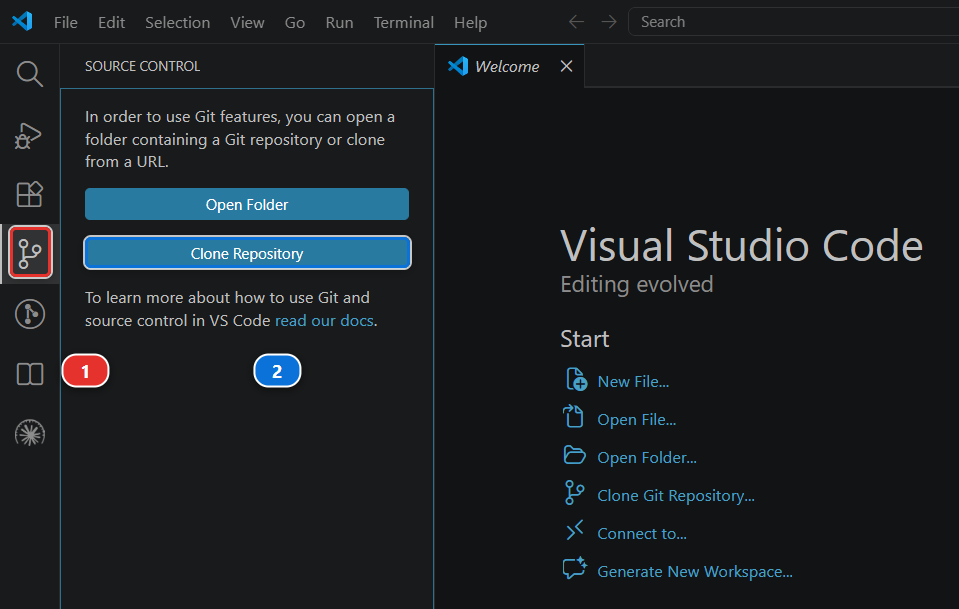
Then:
- Paste
https://github.com/hardisgroupcom/sfdx-hardis-training.gitand press Enter - Pick the folder to put it in. VS Code creates a
sfdx-hardis-trainingfolder inside the one you choose, so choose the place you want every repository to live from now on. If you have no such place yet, make one:C:\giton Windows,~/giton macOS and Linux. Short path, no spaces, not inside OneDrive or any folder that syncs, because a sync client and a git repository fight over the same files - When it asks, click Open to work in the clone
If GitHub asks you to sign in, let VS Code handle it: Sign in with your browser is enough.
You do not need an empty folder first
Clone Repository asks where to put the project, so there is nothing to prepare. The two buttons in the picture only appear while no folder is open: once one is, the Source Control panel shows that folder's changes instead.
Under the hood: what opening the folder told the extension
The extension read a handful of files, and it reads them again whenever they change, so you never have to reload the window:
sfdx-project.json, which says the Salesforce sources live inforce-appconfig/.sfdx-hardis.yml, the project configuration: major branches, cleaning rules, the Training menuconfig/project-scratch-def.json, the shape of the scratch orgs this project createsconfig/branches/, one file per major branch, saying which org it deploys to
Those branch files are empty of your details until step 5 fills them in.
4. Install the GitHub CLI
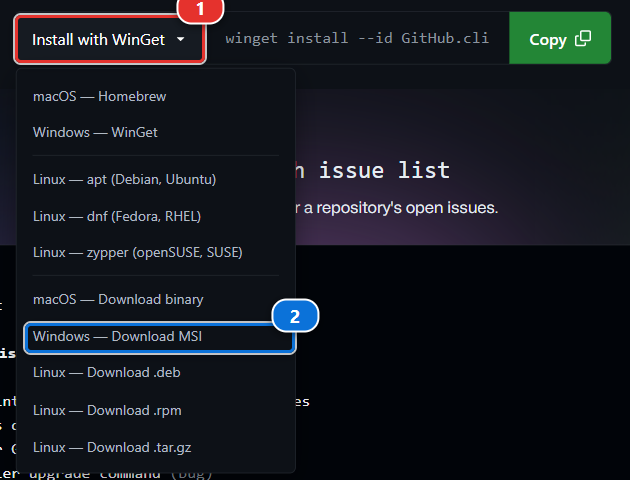
One tool first, and only for this. The command in step 5 uses the
GitHub CLI, called gh, to make your copy of the repository and set its
automation up. On its home page, open the install list (1) and take the download for your
machine: Windows - Download MSI (2), or macOS - Download binary. Accept the installer's
defaults.
Restart VS Code after installing it
The installer adds gh to the PATH, and a VS Code that was already open does not see the
change until it starts again. Close VS Code completely, windows and all, and open it again on
the project. Skip this and step 5 stops at once, saying the GitHub CLI is not installed.
You never have to run gh yourself. The command in step 5 uses it and signs you in through your
browser the first time it needs to.
This one is for the course, and for GitHub
It is here so that one click can hand you a working pipeline instead of a dozen forms. Nothing else in the course needs it, and nothing in sfdx-hardis does: this project happens to live on GitHub, and GitLab, Azure DevOps and Bitbucket projects work exactly the same way without it. On a real project you would join a repository that already exists, with its automation already running, and you would never install this.
5. Set up your training environment
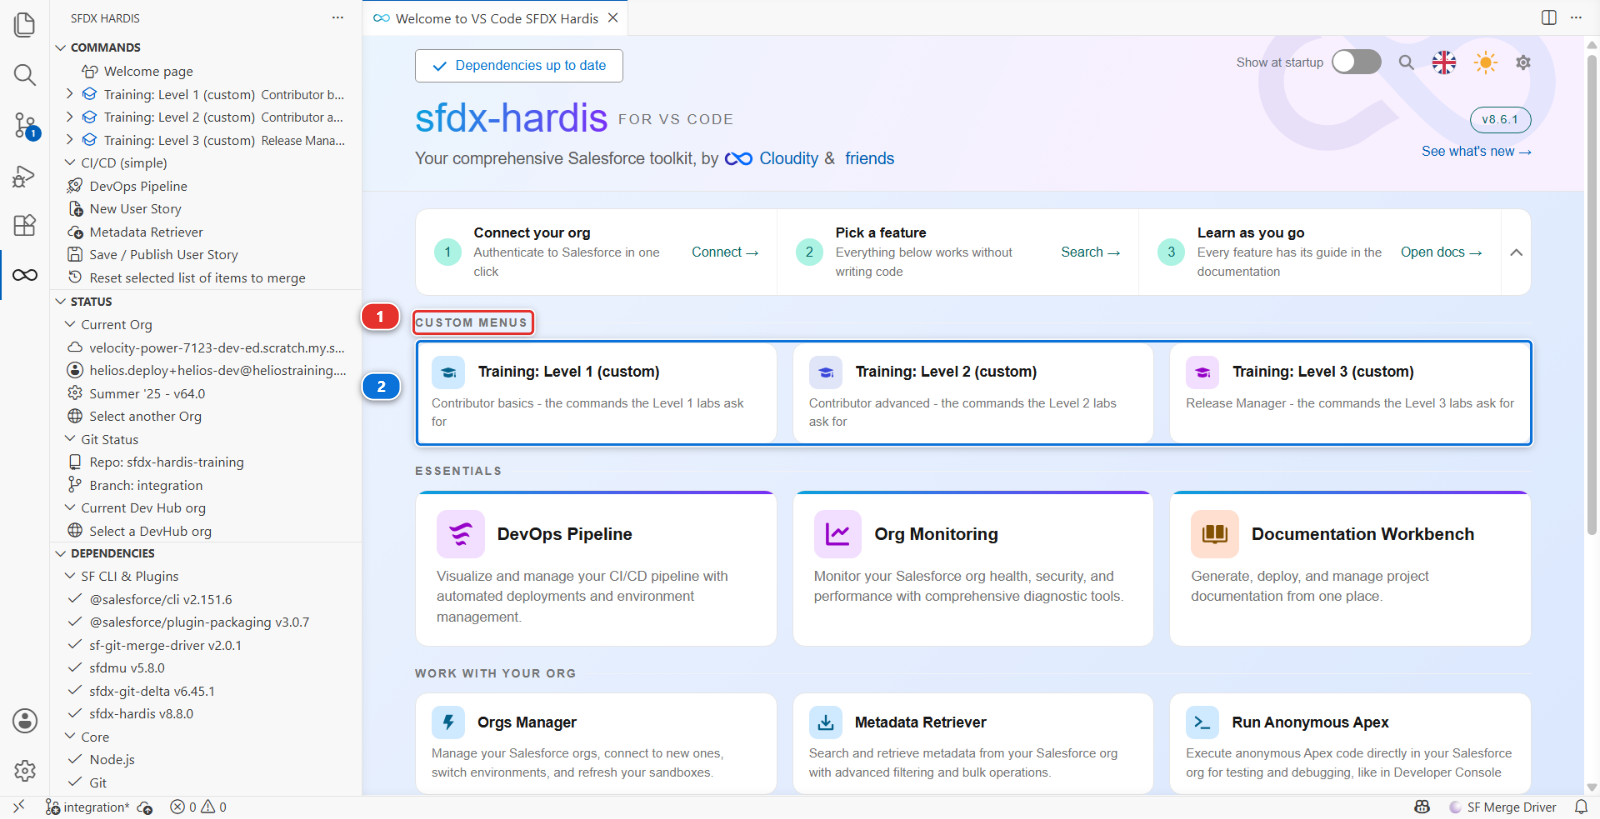
Open the Welcome page again. Above the built-in cards there is a CUSTOM MENUS heading (1), holding three cards (2), one per level.
Where those cards come from
They are not part of the product. Any project can declare its own menus in its
config/.sfdx-hardis.yml, and the extension shows them here, marked (custom), so you can
always tell a project's commands from the ones sfdx-hardis ships. This project declares one
menu per level, and each holds only the commands that level uses.
Click Training: Level 1, then click Set up my training environment (1).
The first time you click a Training card, VS Code does not run it. It asks how you want to allow it
(2), and shows the command it is about to run. A custom menu runs something the project wrote,
not something the extension ships, so the extension refuses to run it behind your back. Read the
line, check it says node scripts/training.mjs, then click Always allow (3).
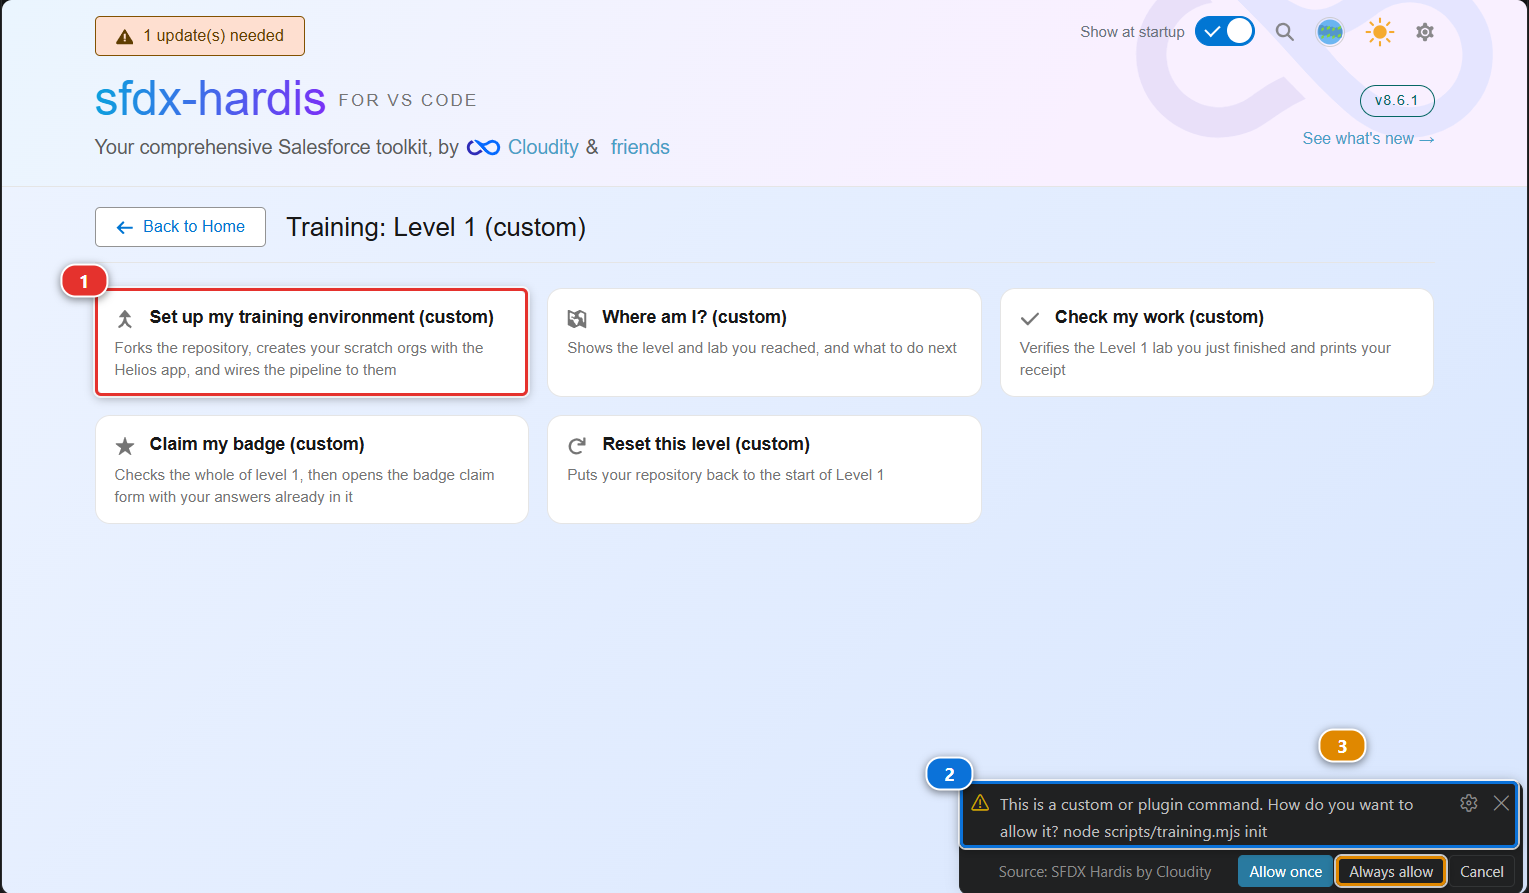
Always allow answers for the whole menu, not for that one card. The Training entries of the three levels stop asking, and nothing else does: the extension recognises a Training command by its shape and by the repository you cloned, so a custom command of any other project still asks you first, in this folder and in every other.
Read the line before you allow it
Allow once runs it this time only, Always allow remembers it. Either is fine here: you can see what it runs, and the repository is the one you cloned. On a project somebody else set up, read that line first. It is the only moment anything shows you what a custom menu really does.
It does not ask which org to use: you connected one, named helios-prod, so it takes that one, says
so, and asks only for a yes before it changes anything. Then it works through eight steps and tells
you as it goes:
Developer Edition org: helios-prod

1 of 8  Your own copy of the repository
OK  origin is now your-handle/sfdx-hardis-training, and the shared repository is upstream.

2 of 8  Actions turned on
OK  Actions are on.

3 of 8  Your Dev Hub
OK  helios-prod is a Dev Hub now.

4 of 8  Your three scratch orgs
OK  helios-dev is created, for 30 days.
OK  helios-integration is created, for 30 days.
OK  helios-uat is created, for 30 days.

5 of 8  The Helios app in each of them
OK  helios-dev holds the app, your permission set and the sample data.
...

6 of 8  The credentials the CI jobs use
OK  SFDX_AUTH_URL_INTEGRATION is set on your-handle/sfdx-hardis-training.
OK  SFDX_AUTH_URL_UAT is set on your-handle/sfdx-hardis-training.

7 of 8  Which org each branch deploys to
OK  integration now names the org of every branch, and is pushed.

8 of 8  Changes through a Pull Request, merged once green
OK  integration now takes changes through a Pull Request only, merged once its checks are green.
OK  uat now takes changes through a Pull Request only, merged once its checks are green.
Count on fifteen to twenty minutes, nearly all of it steps 4 and 5, when Salesforce creates the orgs and the app is deployed into all three at once. Nothing prints while that happens. It is not stuck.
Running it twice is harmless: every step checks before it acts, and an org that already exists is kept. If one of the steps cannot be done from here, it says so and tells you which button to click instead.
Under the hood: what "Set up my training environment" just did
The card runs one command, declared by this project in config/.sfdx-hardis.yml under
customCommands:
node scripts/training.mjs init
which in turn runs real commands you will meet again on real projects. The Dev Hub is one setting, deployed as metadata. Each scratch org is:
sf org create scratch --definition-file config/project-scratch-def.json \
  --alias helios-dev --target-dev-hub helios-prod --duration-days 30
and each of them is then seeded:
sf project deploy start --source-dir force-app --target-org helios-dev
sf org assign permset --name Helios_Delivery_Manager --target-org helios-dev
sf hardis:org:data:import --path scripts/data/HeliosBaseline --target-org helios-dev
The order of those three matters, and not in the way you would guess. A metadata deployment grants no field level security to anybody, not even to a System Administrator. Load the data before assigning the permission set and the load fails on fields the running user cannot see, with an error message that says nothing about permissions.
The data load is an upsert on an external id, so running it twice updates the same 235 records instead of creating 470. Anything in this course that can be run twice, can be run twice.
It made this folder point at your orgs, in the git-ignored .sf directory:
sf config set target-dev-hub=helios-prod target-org=helios-dev
And it protected integration and uat with one call to the GitHub API per branch: changes only
through a Pull Request, merged only once its checks are green, for everybody. You will set the same
rule on preprod and main in Lab 3.1:
gh api -X PUT repos/<your-handle>/sfdx-hardis-training/branches/integration/protection \
  -F "required_pull_request_reviews[required_approving_review_count]=0" \
  -f "required_status_checks[contexts][]=Simulate Deployment to Major Org" \
  -f "required_status_checks[contexts][]=Mega-Linter" \
  -F enforce_admins=true ...
enforce_admins is the part that matters: without it, the owner of the fork, you, could still
merge on red. Setting up the environment and resetting a level lift that protection for the one
push they make to those branches themselves, and put it back straight after.
6. What it just did
Seven things, each of them real work on a real project, and none of them yours to repeat:
- Your own copy of the repository, its fork, under your GitHub account. Your clone pushes
there now, and still pulls from the team's repository. The fork carries the two branches the
pipeline uses today,
integrationanduat, andmain. You addpreprodyourself in Lab 3.1 - Actions turned on. GitHub disables workflows on every new fork until the owner says otherwise, and a fork with them off looks exactly like a broken course
helios-prodbecame a Dev Hub, which is one switch in Setup, and cannot be switched back- Three scratch orgs, each holding the Helios app, your permission set and the sample data:
| Org | What it is for |
|---|---|
helios-dev |
Your own development org, where you build. Nobody else works in it |
helios-integration |
The shared integration org, where the team's work is merged and deployed |
helios-uat |
User acceptance, where the business tests what integration has collected |
- Which org each branch deploys to, written into the project's one configuration file per
branch, in
config/branches/, committed onintegrationand pushed to your fork (your own copy of the course repository on GitHub, for examplegithub.com/my-username/sfdx-hardis-training). The repository could not know that: your orgs did not exist when it was written. It is pushed because the badge check clones your fork (github.com/my-username/sfdx-hardis-training) and reads what is actually in it.uatreceives the same files with its first promotion, in Lab 3.5, the way every change reaches it integrationanduatprotected. A Pull Request into either one can only be merged once every check GitHub runs on it has finished green, and that rule holds for you too, the owner of the fork. On a real project somebody set this up on day one: a merge on a red check deploys nothing, or half of something, and the next person to merge finds out- A credential for each CI job. CI jobs are the automated jobs GitHub runs for you, on its own
machines rather than on yours, and those machines cannot reach a Salesforce org without one. They
are kept as repository secrets, named
SFDX_AUTH_URL_INTEGRATIONandSFDX_AUTH_URL_UAT
Scratch orgs expire after 30 days
That is the deal with scratch orgs, and it is fine for a course. If you come back after a month and an org is gone, click Set up my training environment again, from the Training menu of whichever level you are on. It rebuilds only what expired, points the pipeline at the new org and updates the secret.
Do not delete them for fun: a Developer Edition Dev Hub can only create a few new scratch orgs a day.
About those credentials, and why they are a deliberate exception
An SFDX auth URL embeds a long-lived OAuth refresh token. Anyone who reads it has your org until you revoke it, and it cannot be rotated without authenticating again. The sfdx-hardis documentation says plainly: never use it for a major org.
That guidance is right, and it is about real major orgs. Here the orgs are throwaway scratch orgs holding fictional solar installations, in a repository you own, for a course. The trade is: a beginner reaches a working pipeline in their first hour instead of their second day.
Lab 3.1 sets up JWT properly for all four orgs, and deletes these secrets. If you only ever do Levels 1 and 2, delete the secrets when you are done: the scratch orgs delete themselves.
7. Let the extension talk to GitHub
The command you just ran used the GitHub CLI. The extension has its own connection to GitHub, and it needs one too: without it the pipeline diagram can draw your branches but knows nothing about your Pull Requests.
On the Welcome page, click DevOps Pipeline. At the top of the panel there is a GitHub icon (1). It is grey while the extension is not connected, and its tooltip reads Connect to GitHub.
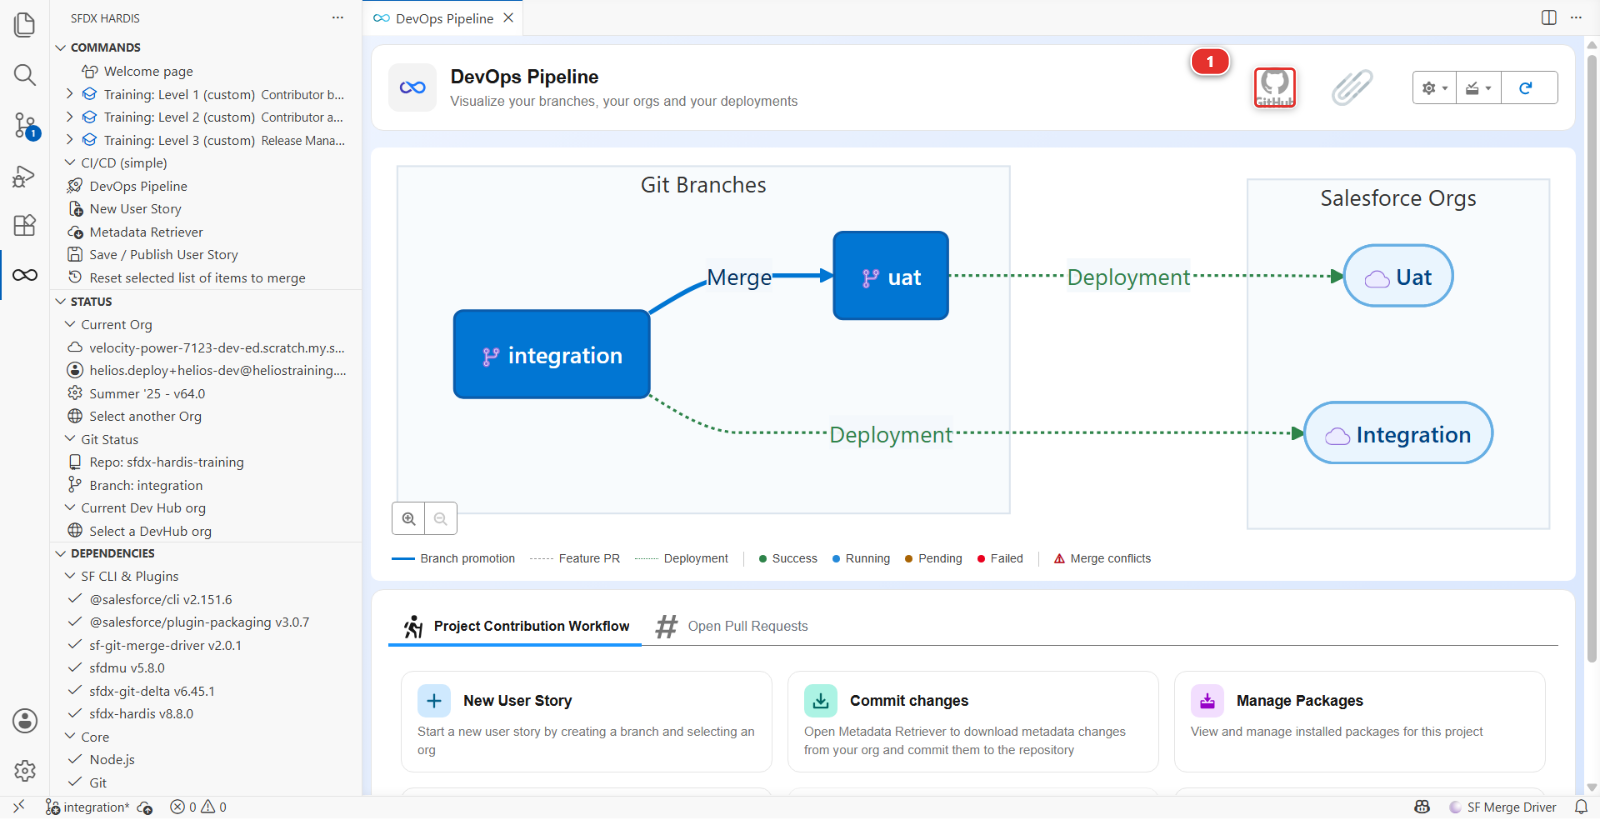
Click it. VS Code asks How would you like to authenticate to GitHub? and offers two answers:
- Sign in with VS Code, which opens your browser and is what you want here
- Use Personal Access Token (PAT), for a host VS Code cannot sign in to, or an account you keep separate
Take Sign in with VS Code and approve the request in the browser. The icon turns from grey to colour, its tooltip becomes Connected to GitHub, and the panel gains what it could not show before: the Pull Requests on your branches, and the Show feature branches toggle.
8. Look at the pipeline before touching anything
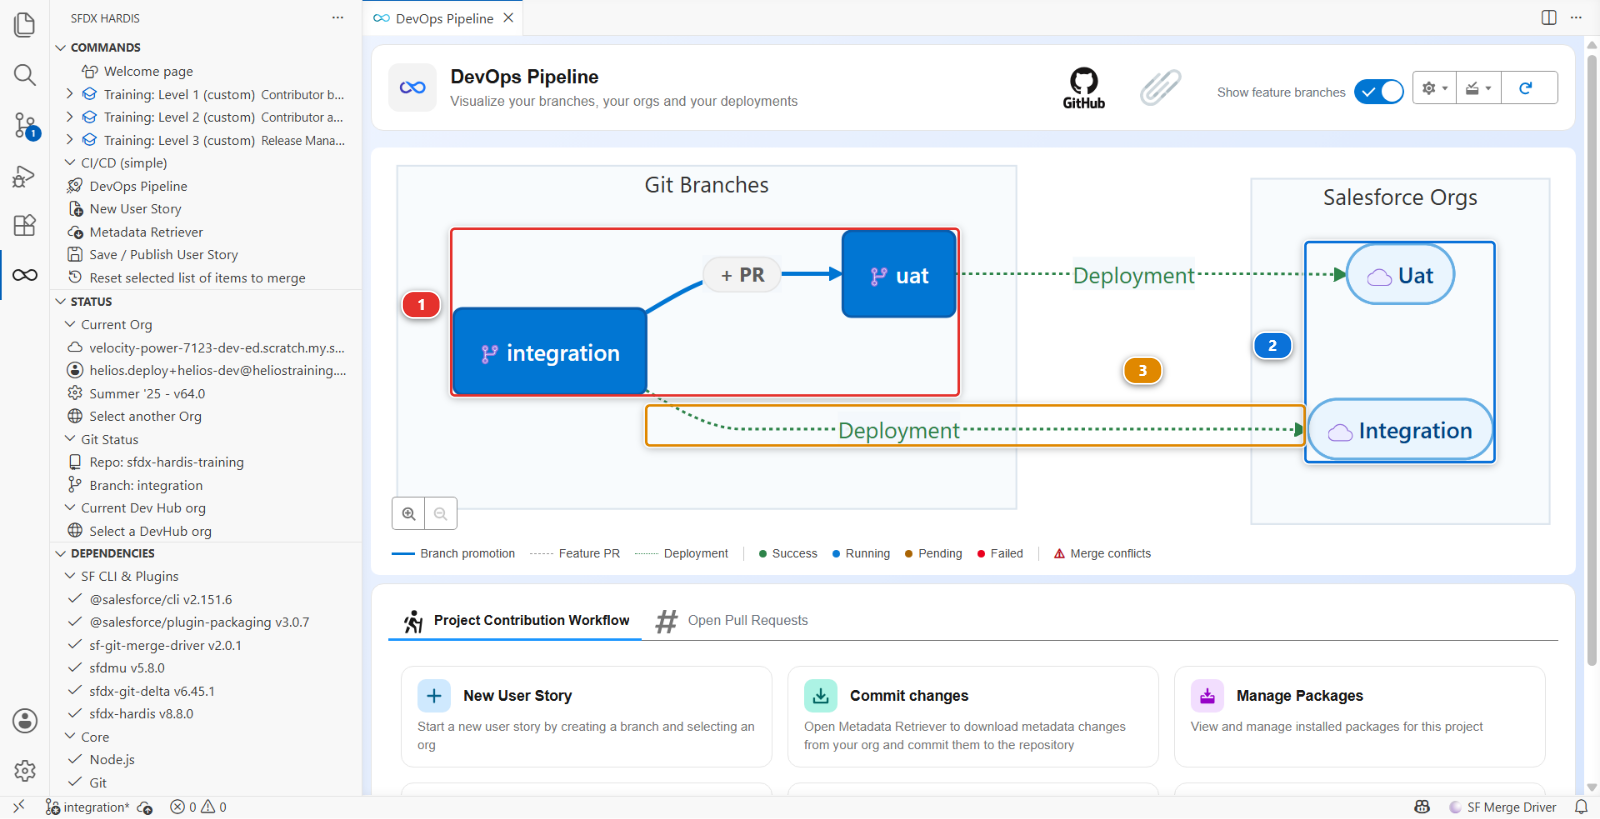
Two branches, two orgs, and arrows. That is the whole of your pipeline today, and it is worth a minute because every diagram you meet later is this one with more in it.
integrationanduat(1) are git branches, the two major branches this project has so far. Major means the team shares them: everybody's work ends up there, and nobody builds directly on them- The two boxes on the right (2) are the Salesforce orgs those branches own, the ones the setup
named
helios-integrationandhelios-uat. The diagram labels them after their branch, so they read Integration and Uat. One branch, one org, and that pairing is what the setup you just ran wrote down - The arrows (3) are the deployments, and the way work travels. Whatever reaches
integrationis deployed into its org by a robot, without anybody clicking anything. Moving work on fromintegrationtouatis a promotion, and it is the release manager's job, which is what Level 3 makes you
Nothing else is drawn, because nothing else exists yet. You have no branch of your own in flight and no Pull Request open, so the diagram has nothing to add. Lab 1.3 puts the first box on the left of this picture, and from then on it fills up.
Your own helios-dev is not in the diagram either, and that is correct: the diagram shows where work
is deployed, and nothing is ever deployed into the org you build in.
preprod and main are missing on purpose
Your fork (github.com/my-username/sfdx-hardis-training) has a main branch, and no
preprod yet, and the diagram shows neither: a branch becomes part of the pipeline only once
somebody says which org it deploys to, and nobody has.
That is the shape of this course. Levels 1 and 2 are the work of a contributor, which happens
between a feature branch and integration. Level 3 is the work of a release manager, and its
first lab wires preprod and main into this same diagram, with helios-prod as production.
What you should see
Back in the DevOps Pipeline panel, click Refresh. integration and uat, each with its org,
and the GitHub icon at the top in colour rather than grey. In Orgs Manager, four orgs:
helios-prod, helios-dev, helios-integration and helios-uat, all Connected.
That is the whole of the plumbing, and the last of it you will see. From Lab 1.3 on you are doing the job rather than preparing to do it: a ticket, a branch, a change, a Pull Request, a deployment.
If it goes wrong
It says the GitHub CLI is not installed, and you just installed it. VS Code was open during the install and does not see it yet. Close VS Code completely, open it again, and click the card again. If it still says so, install it from cli.github.com, as step 4 shows.
It says no connected org was found.
Step 2 is not finished: connect your Developer Edition org in Orgs Manager and name it
helios-prod.
It says Dev Hub could not be turned on.
Open helios-prod from Orgs Manager, go to Setup, type Dev Hub in the Quick Find box,
switch Enable Dev Hub on, then click the card again.
It says the Dev Hub already has its active scratch orgs.
A Developer Edition Dev Hub keeps three alive at once, and something else is using the allowance.
Open helios-prod, then App Launcher > Active Scratch Orgs, delete the ones this course did not
create, and click the card again.
It says the daily allowance is used up. You created and deleted scratch orgs several times today. The allowance comes back within 24 hours: click the card again tomorrow, and everything already done is kept. Deleting a scratch org does not give its allowance back, so resist the urge to delete and recreate: Reset this level puts the branches back without touching the orgs, and Clean up a training org empties one without deleting it.
A command fails with TotalRequests Limit exceeded.
A Developer Edition org answers a fixed number of API calls a day, and a long session of
deployments, seeding and monitoring can use them up. Nothing is broken and nothing is lost: your
work is on your fork. The allowance comes back over the following hours, so this is the moment to
read the Under the hood blocks of the labs you have done, and to come back to the clicking later.
It says Actions could not be turned on from here.
GitHub hides that switch behind a banner with no API. Open the Actions tab of your fork (github.com/my-username/sfdx-hardis-training) and
click I understand my workflows, go ahead and enable them. One click, and the command has
nothing left to do.
The Actions tab shows no workflows.
You forked by hand at some point and left "Copy the main branch only" ticked. Delete the fork on
GitHub and click Set up my training environment again: it never copies the default branch alone.
The pipeline diagram is empty.
The extension did not find config/.sfdx-hardis.yml. You opened the wrong folder: it must be the
root of the clone, the folder that directly contains sfdx-project.json.
The pipeline shows branches but no Pull Requests. The extension is not connected to GitHub. That is step 7, and the icon at the top of the panel is grey.
VS Code cannot push and asks for credentials in a loop. Sign out of GitHub in VS Code (Accounts icon, bottom left) and sign in again with your browser.
Check your work
Welcome page > Training: Level 1 > Check my work, then pick Lab 1.2.
Go deeper
Next: Lab 1.3 - Start a User Story on its own Git branch