Lab 1.5 - Retrieve, commit and publish your Salesforce changes
Level: 1 Contributor basics
Time: ~20 min
You will: bring your org changes into the repository, decide which of them belong to your story, and push a branch that is ready to be reviewed.
The situation
Your field exists in one org. If your laptop died tonight, so would the story. Publishing is what turns "it works in my org" into "the team has it".
This is the step where most of the thinking happens in a CI/CD project, and the one people rush. Go slowly here once, and every following story takes five minutes.
Before you start
- Lab 1.4 finished: the field exists in
helios-dev, granted to the crew, on the layout - You are still on
features/US-014-panels-required
Steps
1. Bring your changes out of the org
Your field is in Salesforce. Nothing of it is on your machine yet, and git only ever sees what is on your machine.
In the DevOps Pipeline panel, under Project Contribution Workflow, click the Commit changes card (1).
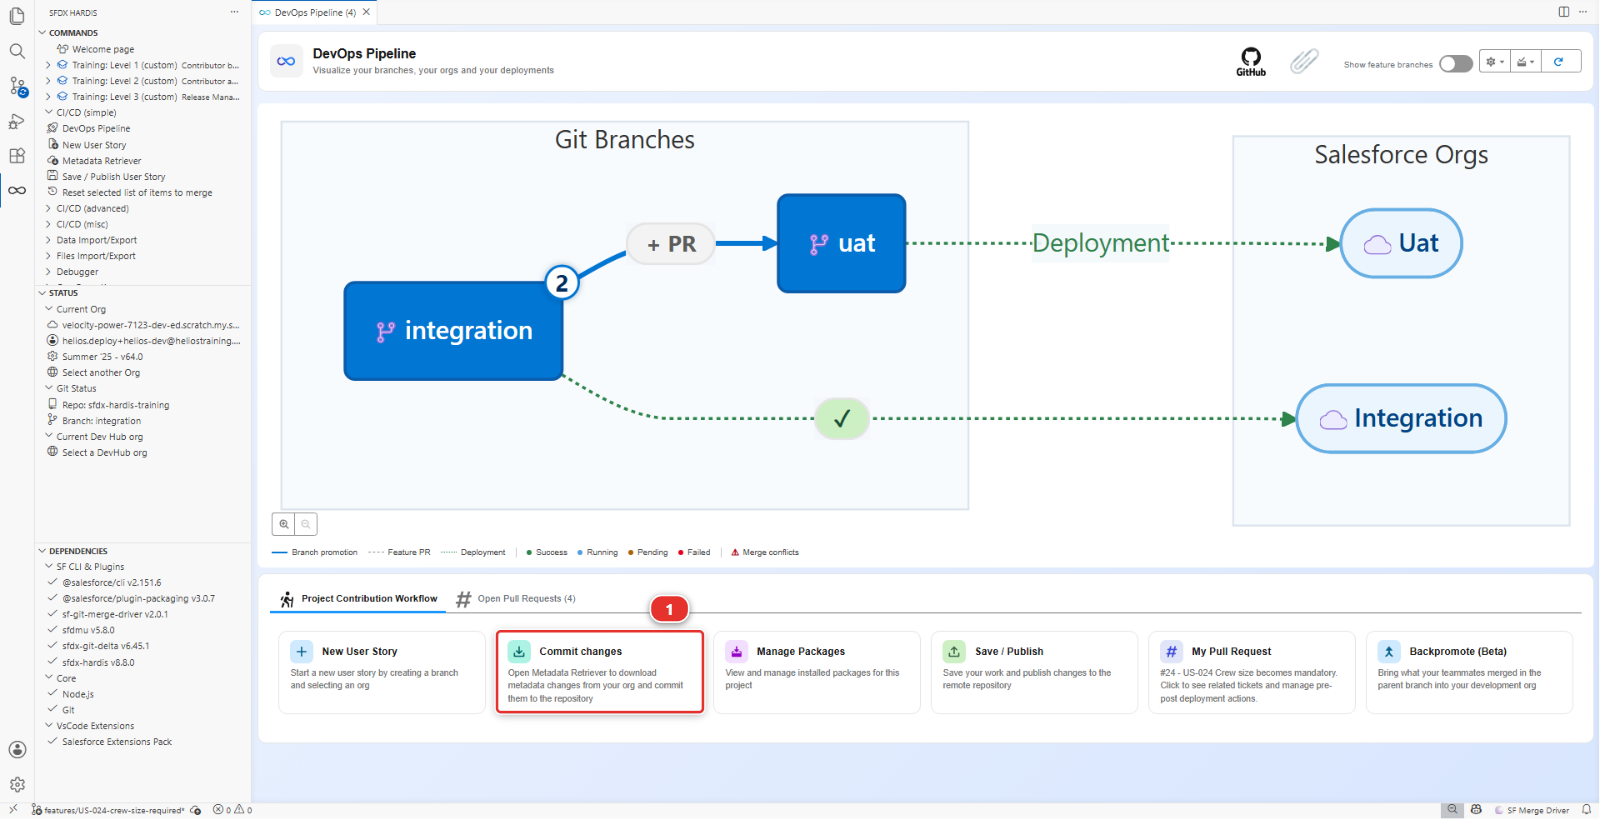
It opens the Metadata Retriever, which is where every publish starts.
2. Ask the org what changed
Check the org (1) reads helios-dev, the org you built in. Recent Changes (2) is
already selected: it asks Salesforce what has been modified lately rather than listing the tens of
thousands of components an org contains. Click Search Metadata (3).
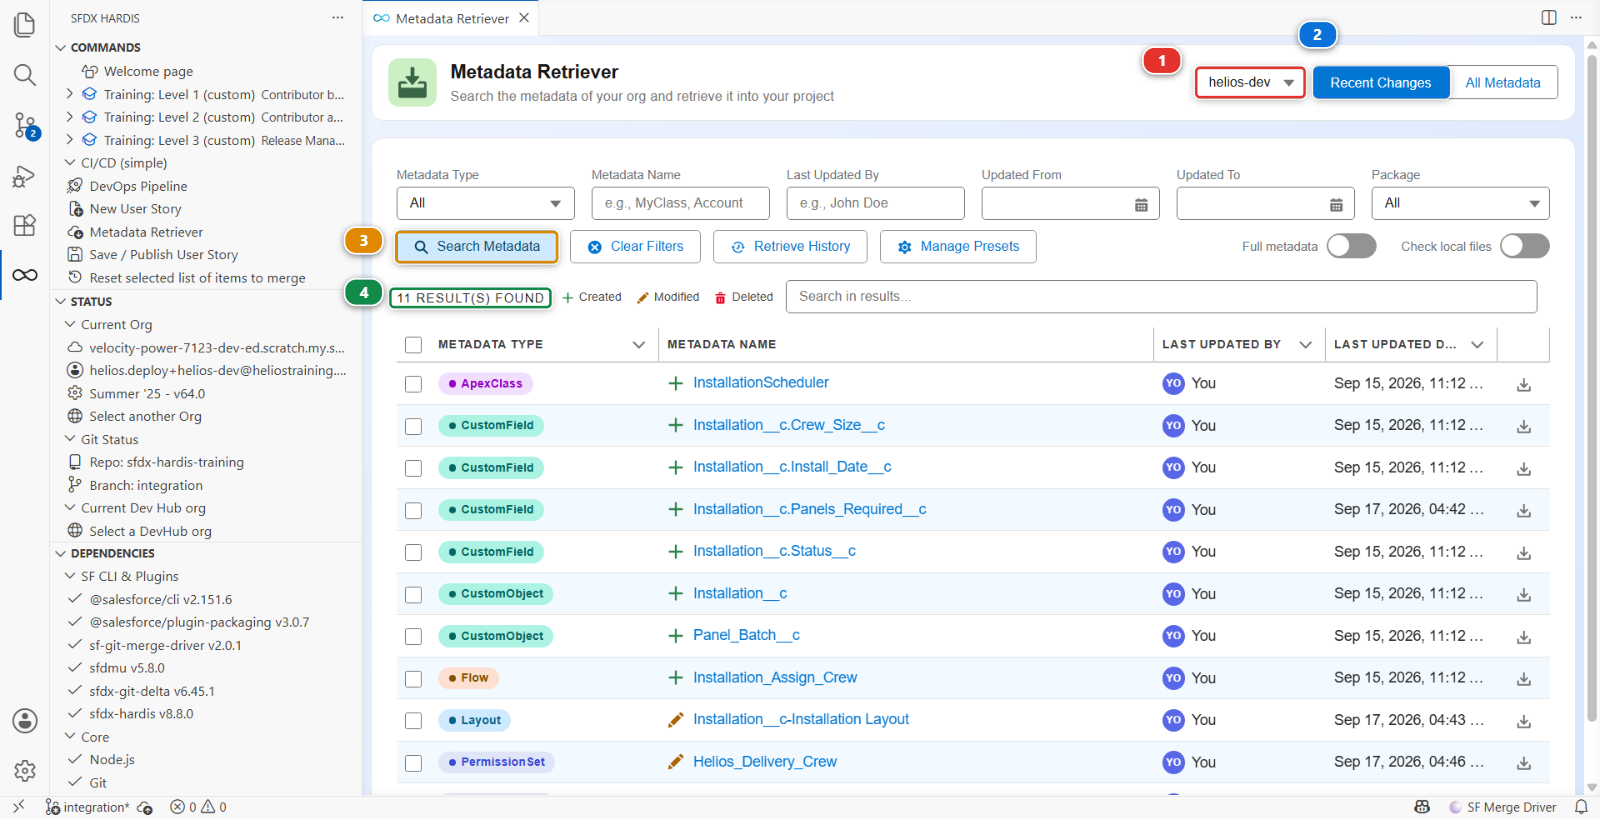
About thirty results come back (4), each with what it is, its name, who last touched it and when. Every one of them carries your name, and most of them are not your story.
Why the list is longer than your story
A scratch org remembers every component that arrived in it, however it arrived. In Lab 1.2,
Set up my training environment deployed the whole Helios app into helios-dev under your
user, so every object, field and permission set of the app is in this list, dated Lab 1.2. Your
four changes are the ones dated a few minutes ago.
Click the Last Updated Date column header, twice if needed, so the newest come first. On a team org the older rows would be your colleagues and Salesforce moving things on its own. Either way it is exactly why the next step is a decision rather than a button.
3. Take yours, leave the rest
Sorted newest first, your four are the four at the top. Tick them, and only them:
- PermissionSet
Helios_Delivery_Manager(1) - the planners' edit access - PermissionSet
Helios_Delivery_Crew(2) - the crew's read access - Layout
Installation__c-Installation Layout(3) - the placement, changed when you ticked the layout in the field wizard - CustomField
Installation__c.Panels_Required__c(4) - the field
Then click Retrieve 4 selected (5).
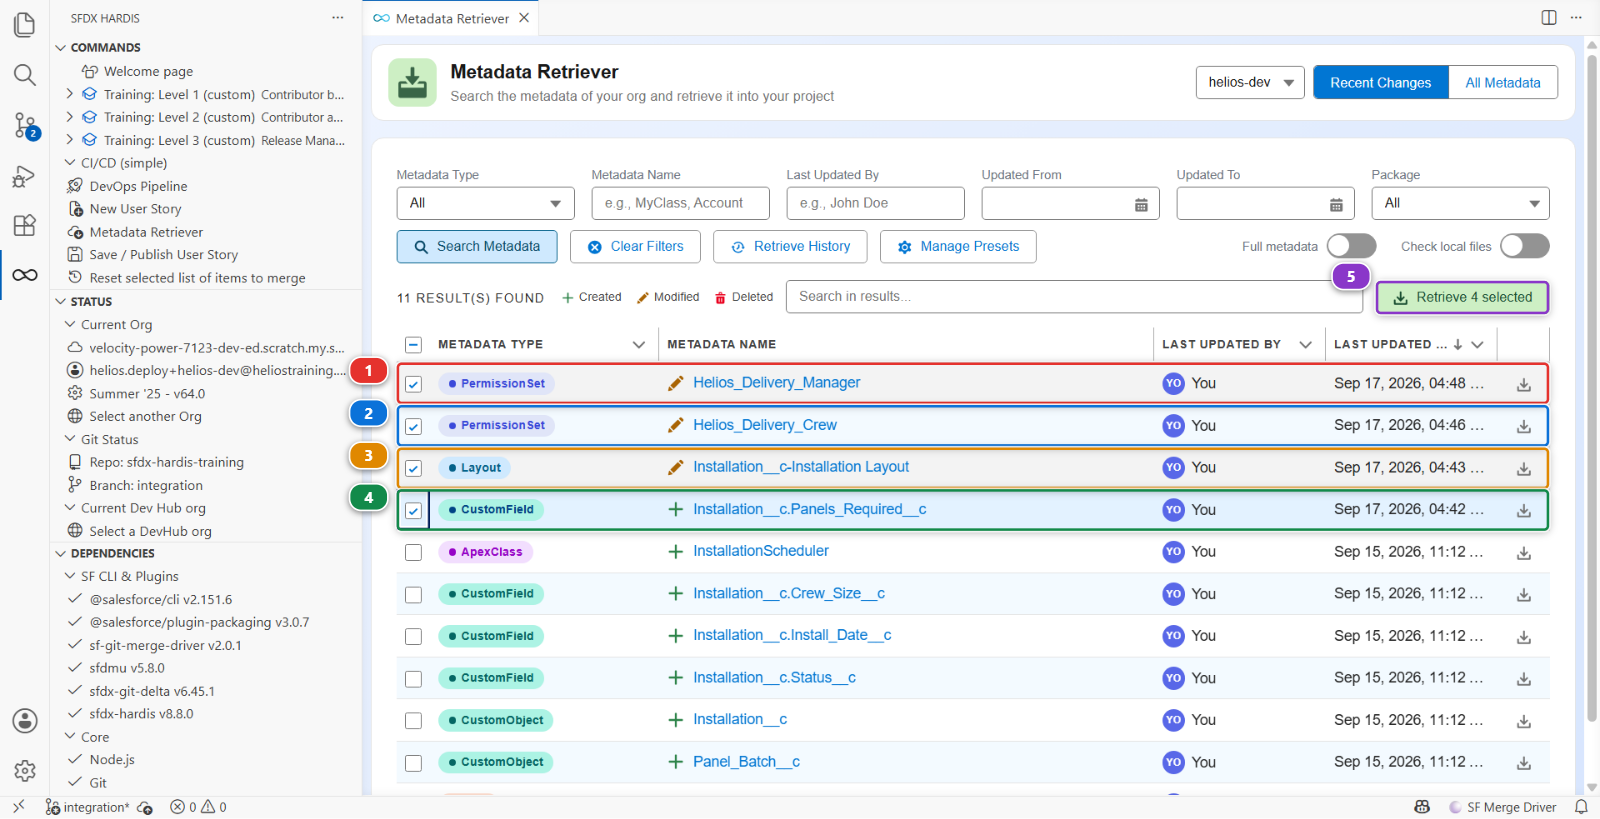
Two rules make that decision for you, and they are the whole of this lab:
- If you did not mean to change it, it does not belong in your story. Committing it makes your Pull Request about something other than US-014, and the reviewer cannot tell which part is yours
- If you are not sure, leave it out. Nothing is lost. It is still in your org, and you can publish it in a later story once you know what it is
The retriever writes those four components into force-app/ as files. It changes nothing in
Salesforce and nothing on your branch yet.
4. Commit what came down
Open the Source Control panel (1): in the left bar, the icon drawn as three small circles joined by lines, like a branch. The four files the retrieve wrote are waiting there (2).
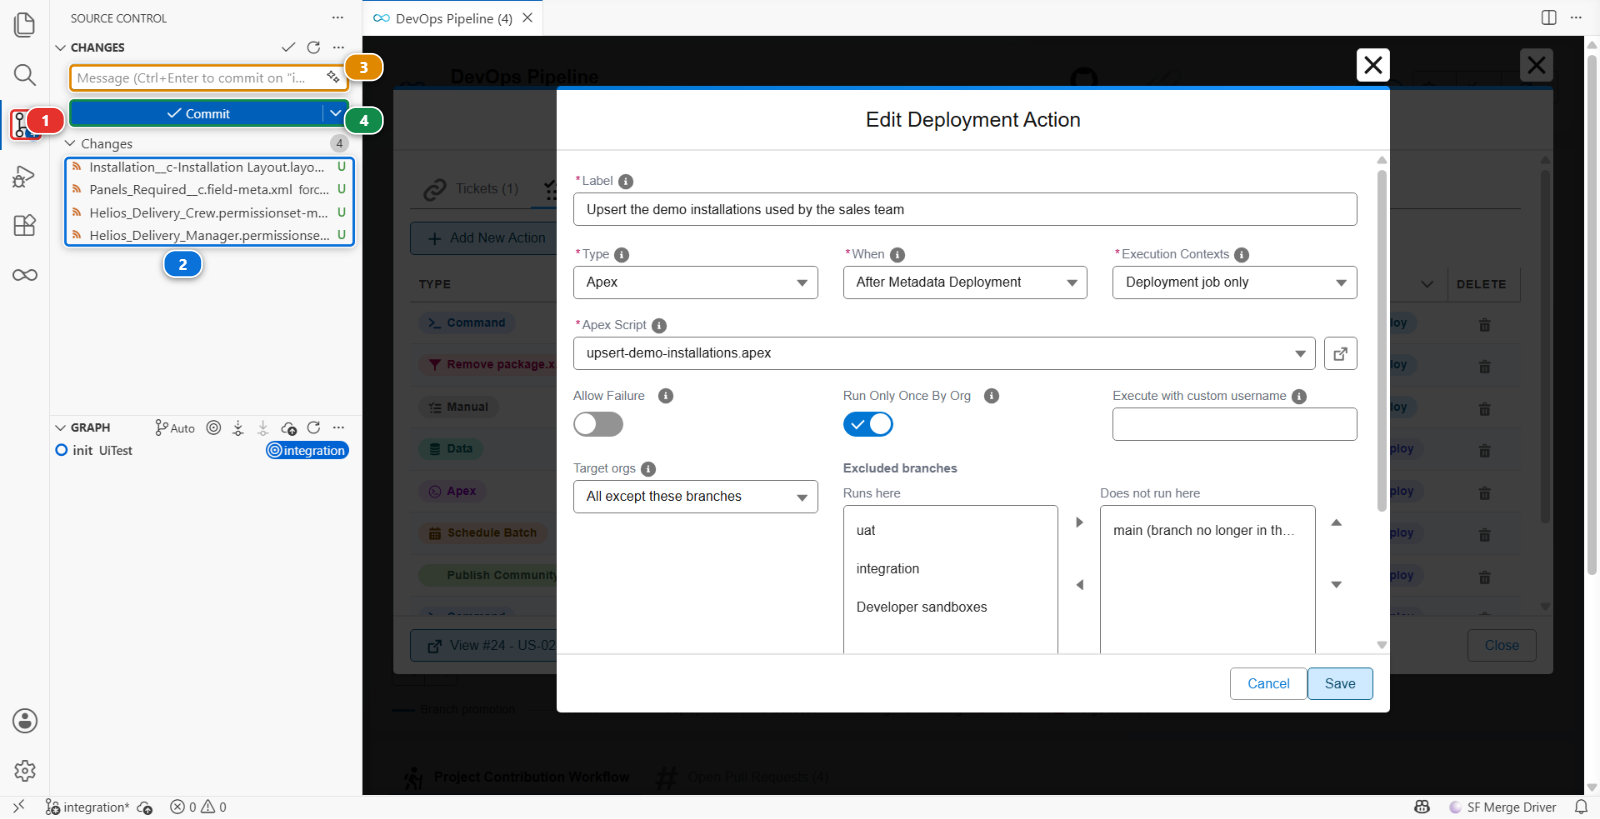
Click each one. VS Code opens the file's diff, the before and the after side by side, with the added lines in green and the removed ones in red. Reading the four takes a minute, and it is the last moment where a mistake is free.
Then put them in the commit one at a time. Point at a file: a row of small icons appears at the right of its name. The + is Stage Changes, and it moves that one file into a group called Staged Changes just above. Do it for each of the four, and read the name as you click.
Never use Stage All Changes
The + on the Changes group header stages everything the panel can see, including files you have never looked at: a stray log, something an installer left behind, a file another command wrote while you were working. The panel above shows only your four files, and yours will not always be that tidy.
Staging is the only moment where you decide what your story contains. Doing it file by file takes ten seconds and it is the difference between a Pull Request a reviewer can read and one that has to be untangled. On a real project this is the habit people notice.
With the four files staged, type a message (3) and click Commit (4). The button commits what is staged and leaves everything else alone.
Write the message for the person reviewing tomorrow, not for yourself today. First line short, then a blank line, then why:
US-014 Panels Required on Installation
Adds Panels_Required__c on Installation__c so the crew knows how many panels to load. Read access for the crew on Helios_Delivery_Crew, edit access for planners on Helios_Delivery_Manager, field added to the Installation layout.
That text follows your branch everywhere: it is what the reviewer sees in the Pull Request, and it is what anybody reading the history of this project in two years will find.
What to do with the file you did not ask for
Leave it unstaged and it stays out of your commit, which is enough for now. If you know what it is and you know it is rubbish, right-click it and Discard Changes. If you do not know what it is, leave it alone and ask: a file you cannot explain is a file that does not belong in your story, and deleting it blindly is not better than committing it blindly.
Your work is now in the repository, on your branch, on your machine. What is left is to prepare it for the team, and that is what Save / Publish does.
5. Publish it
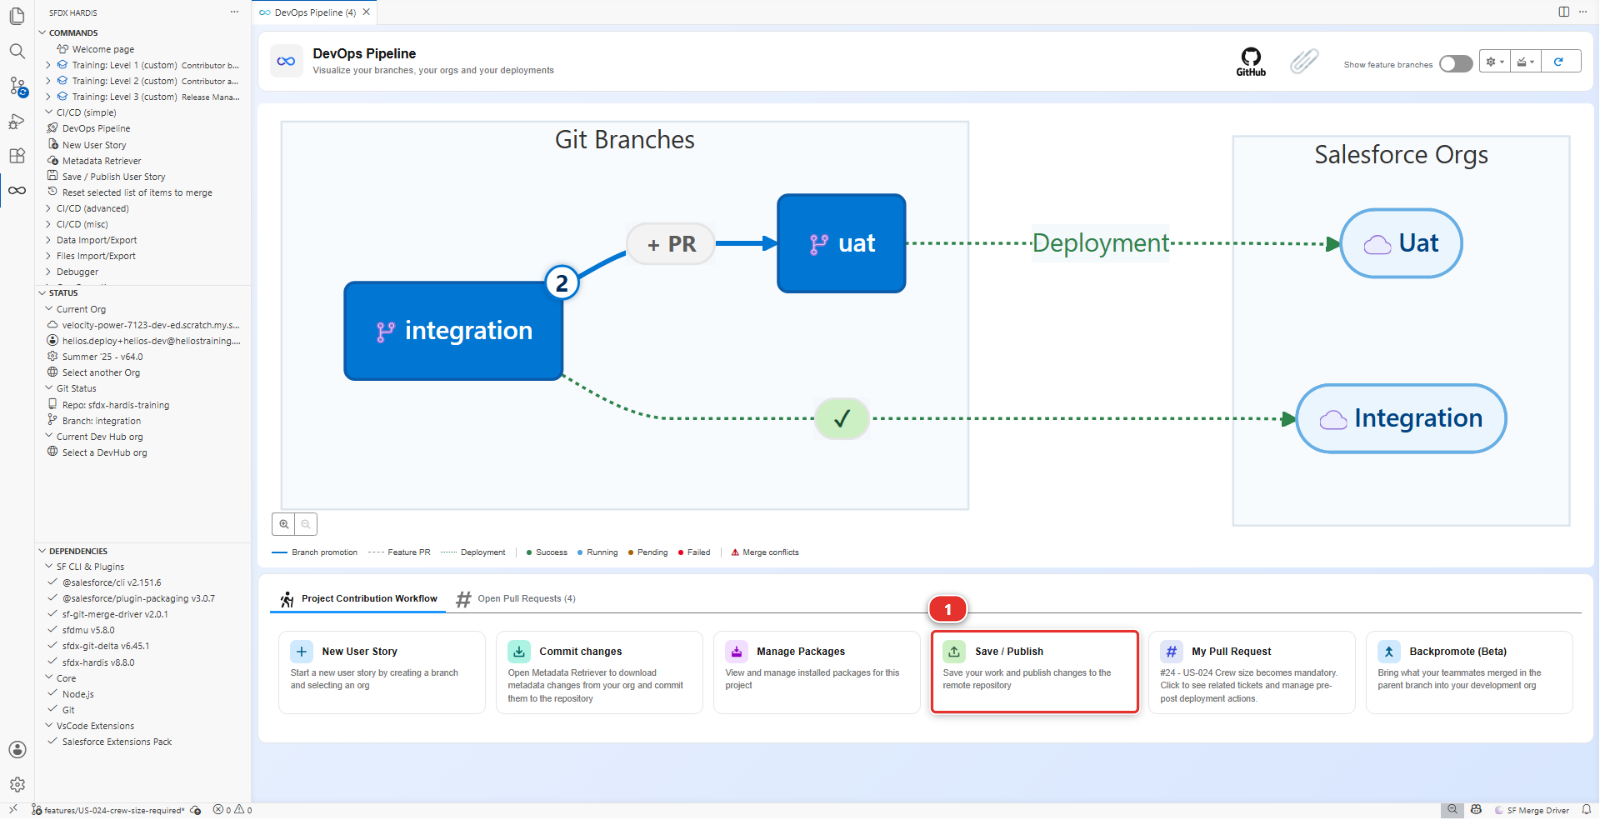
In the DevOps Pipeline panel, click the Save / Publish card (1).
The first question is the one that catches everybody out.
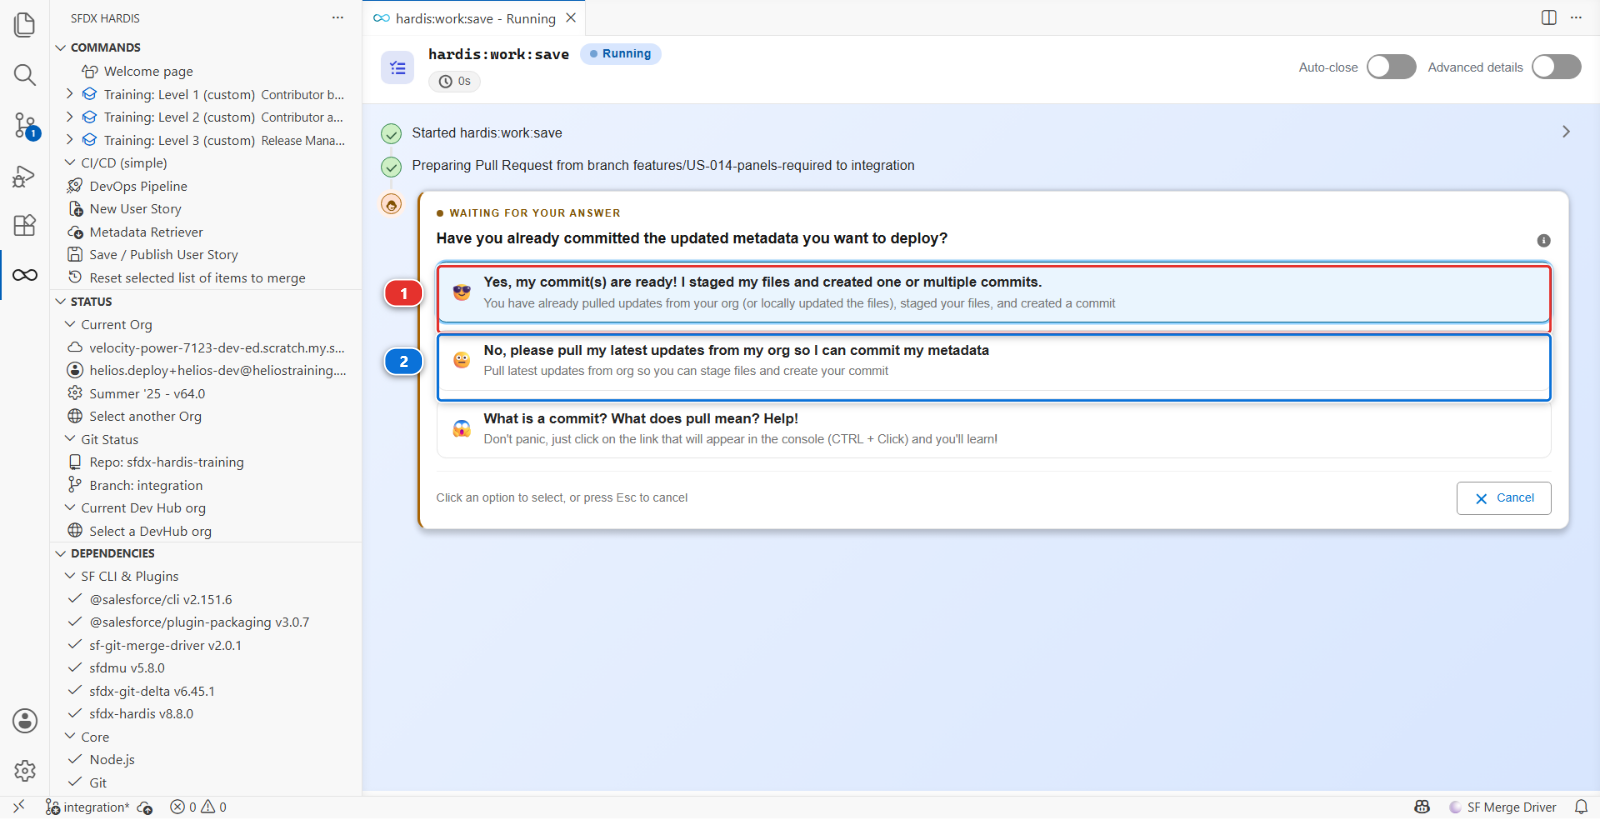
Answer (1), Yes, my commit(s) are ready!, because they are: you retrieved and committed in the steps above. (2) asks the command to pull the org for you instead, and the third answer explains what a commit is, which costs nothing to read.
Commit first, every time
(2) exists for the day you forgot to retrieve and commit. This course never needs it, because the habit it teaches is the one above: retrieve with the Metadata Retriever, read the diff, stage file by file, commit. Keep that habit and the answer is always (1).
6. Read the package before you push
The command pauses before pushing and asks you to confirm (1). Take the pause: this is the last look you get at your story before it leaves your machine.
Click the Git Delta package.xml report at the bottom of the command's panel (2). It is the
list of what your commits changed compared with integration, worked out from git, and the
number on the button is how many components it holds: 4.
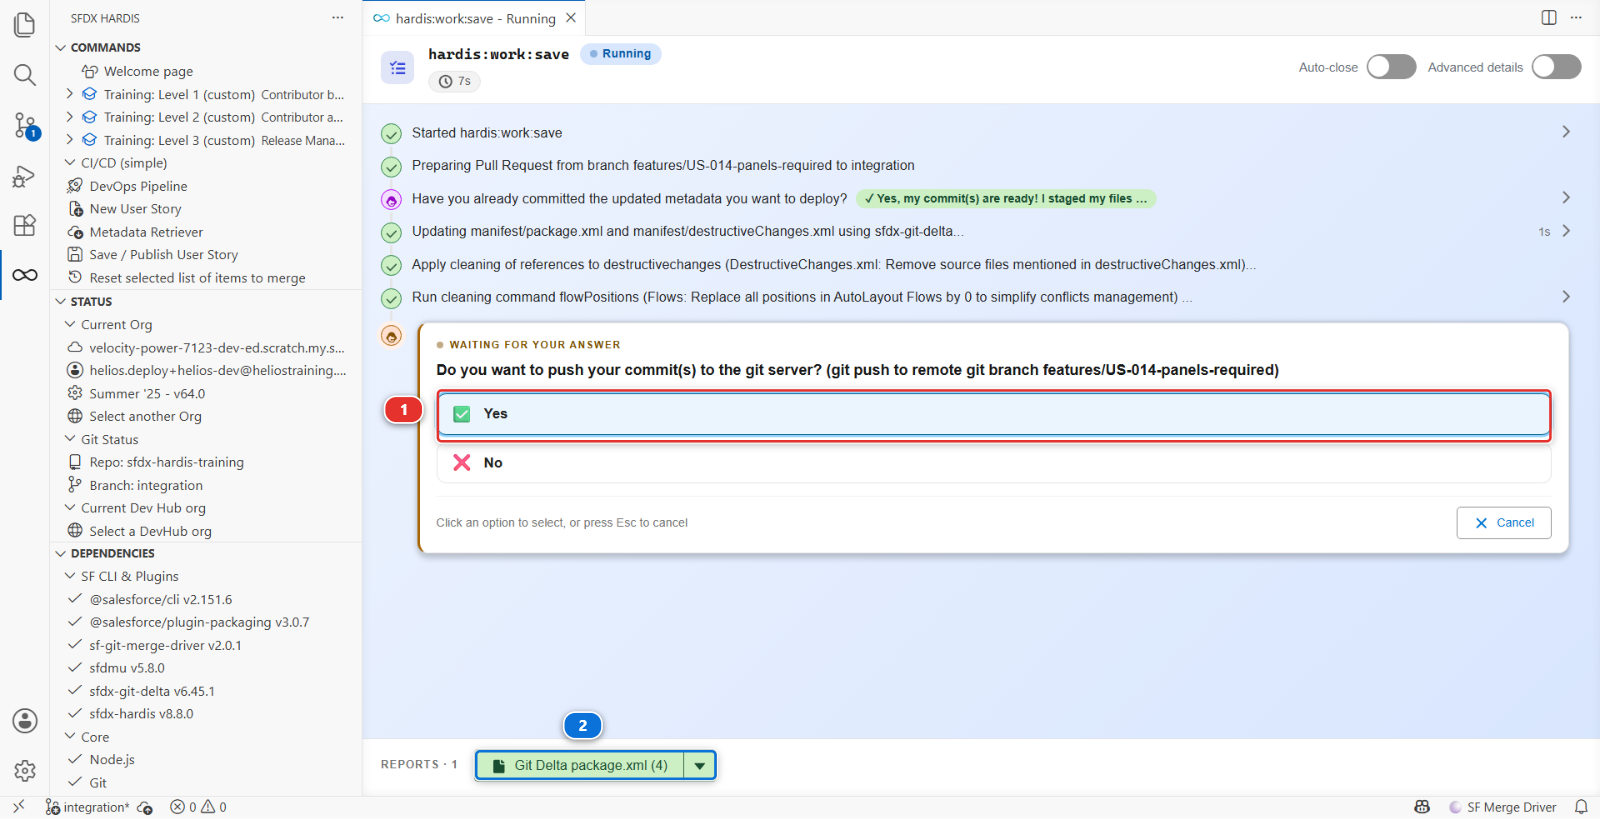
You are looking for one block per kind of thing you changed, each naming what it holds. Your four
should all be there: the field Installation__c.Panels_Required__c, the layout
Installation__c-Installation Layout, and the permission sets Helios_Delivery_Crew and
Helios_Delivery_Manager.
This list is your story, as the pipeline sees it. If a component you expected is missing here, git does not know you changed it, and it will be missing in integration too: the deployment will either fail or, worse, succeed while doing half of what you meant. Reading it before every push is the single habit that separates a contributor who has trouble with deployments from one who does not.
Then open the whole manifest, manifest/package.xml. In the DevOps Pipeline panel, click the
Deployment packages menu (1) in the header, the icon of a box with an arrow, then
Package XML (2).
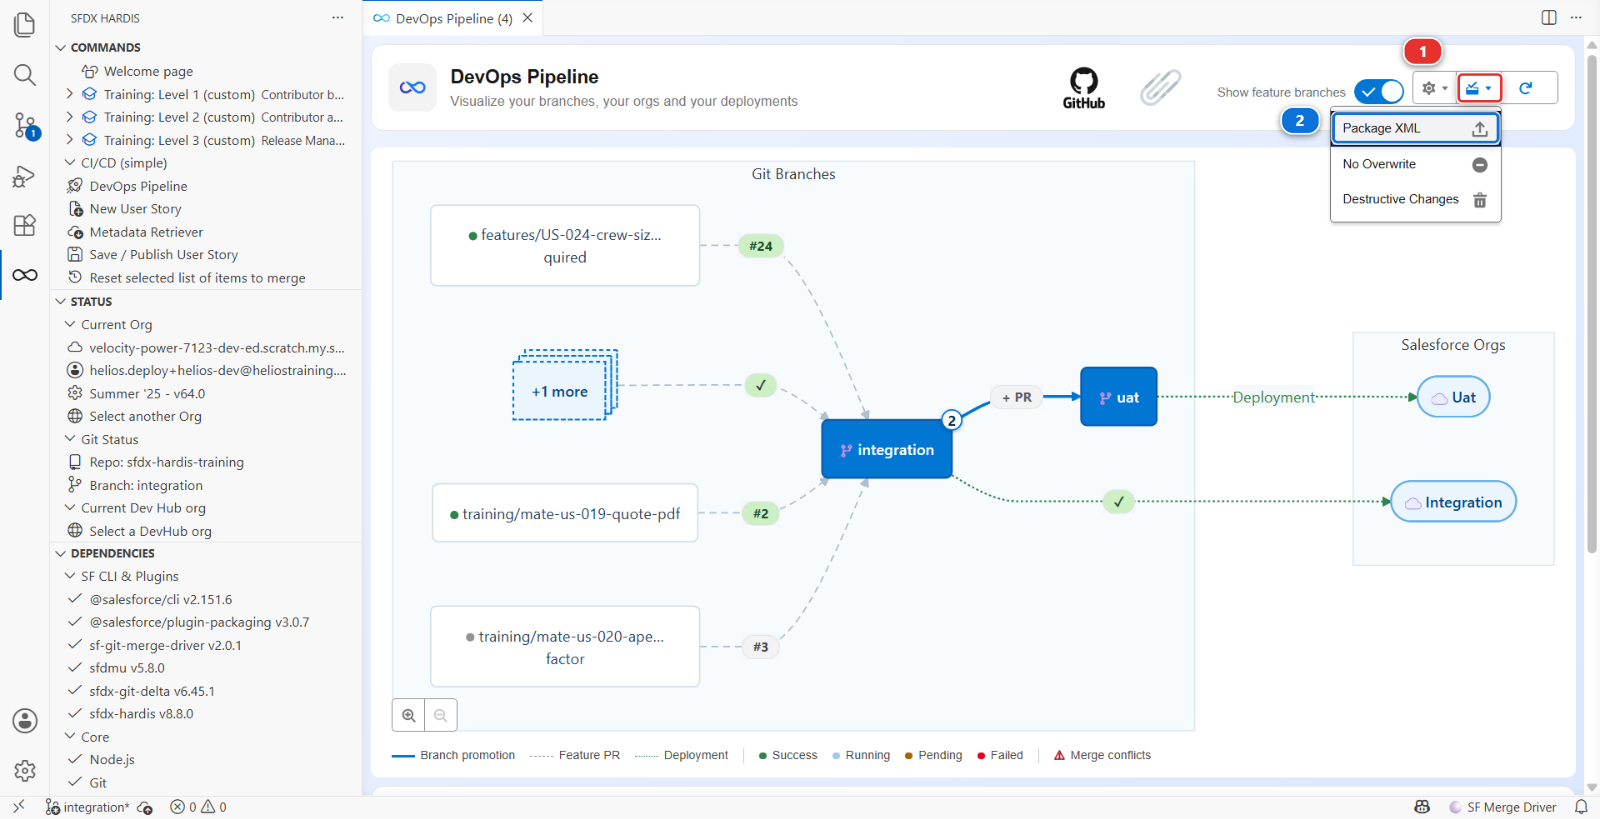
The package viewer opens on the file. Each row is one kind of component, with how many the file
lists. Expand CustomField (1): Installation__c.Panels_Required__c is in it.
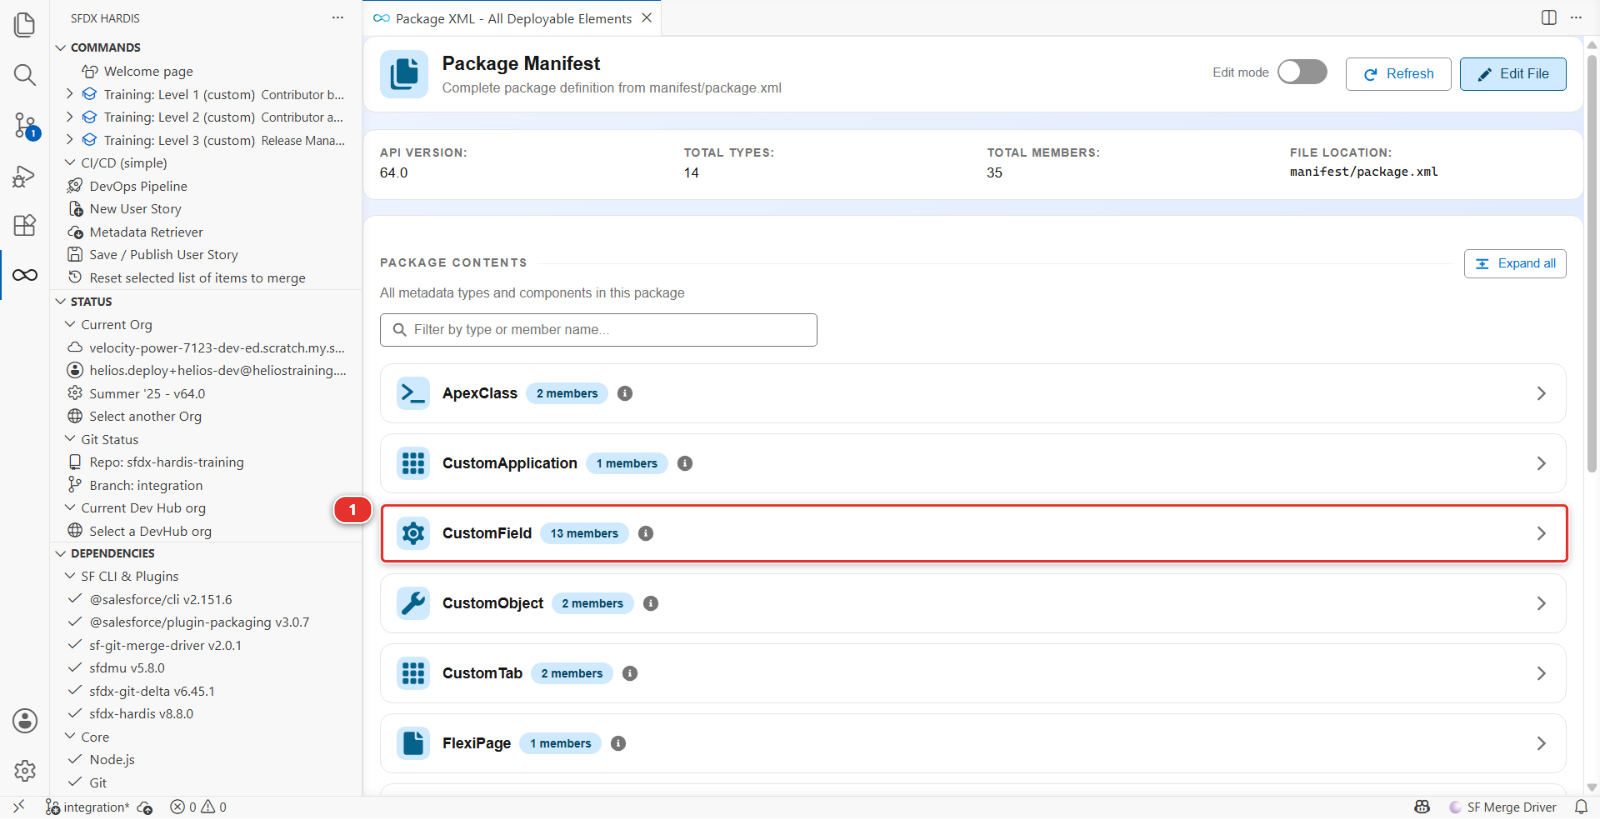
It is much longer than the report, and that is correct: it is the list of everything this project
deploys, the whole Helios app, and every story adds its new components to it. Save / Publish just merged your delta into it, which for US-014 means one new
line, Installation__c.Panels_Required__c: the layout and the two permission sets were listed
already, because the app has always had them. Every deployment of integration sends that whole
file, and Salesforce works out what actually changed.
Under the hood: what those blocks look like
The viewer reads and writes a plain file, manifest/package.xml, and Edit File in its header
opens it as text. The file is XML, and every block pairs a list of members with the name of what they are:
<types>
    <members>Installation__c.Panels_Required__c</members>
    <name>CustomField</name>
</types>
<types>
    <members>Installation__c-Installation Layout</members>
    <name>Layout</name>
</types>
<types>
    <members>Helios_Delivery_Crew</members>
    <members>Helios_Delivery_Manager</members>
    <name>PermissionSet</name>
</types>
Salesforce calls this a manifest, and every deployment tool on the platform reads the same format. The counter on the report button counts entries rather than blocks, so it can read one more than you expect when a change pulls its parent object in with it.
manifest/package.xml has the same shape, with every component of the app. A project can ask the
pipeline to deploy only the delta instead, with useDeltaDeployment, and this one does not: a
full deployment is slower and never forgets anything, which is the right trade for a course.
7. Read what the command did to your files
Scroll back up the command's own panel. Between your answers it printed a few lines about cleaning: references to deleted components, and the pixel positions inside Flows. That is the project's automated cleaning, and it runs on every publish, on everybody's work, so that nobody has to remember the house rules.
On this story it has almost nothing to do, because you changed a field, a layout and a permission set, and the rules here are aimed at Profiles and Flows. It also committed what it changed, on top of your own commit. Level 2 has a whole lab on the day cleaning takes away something you wanted.
Under the hood: what "Save / Publish" just did
The panel ran:
sf hardis:work:save
which performed, in order:
- Worked out the delta, the Git Delta package.xml, from the git diff between your branch and
integration, and merged it intomanifest/package.xml. Not from what you ticked in the retriever: from what your commits actually changed. Those are usually the same thing, and the minute you spend reading the report is the minute you find out when they are not -
Applied the cleaning rules declared in
config/.sfdx-hardis.yml:autoCleanTypes: - destructivechanges - localfields - productrequest - flowPositions - minimizeProfilesflowPositionsstrips the pixel coordinates of flow elements, which change every time anybody opens a flow and produce conflicts that mean nothing.minimizeProfilesremoves from Profiles everything that a Permission Set should carry -
Removed from Profiles the user permissions listed under
autoRemoveUserPermissions, which are permissions this project has decided must never travel between orgs through a deployment. Profiles only: a Permission Set keeps everything it was given - Committed what it changed, as
chore(sfdx-hardis): update package contentandchore(sfdx-hardis): clean sfdx project. Those commits are the tool's, not yours: yours is the one you wrote at step 4 - Pushed the branch to your fork (your own copy of the course repository on GitHub, for example
github.com/my-username/sfdx-hardis-training)
Every one of those steps is configuration, not magic. Everything it did is in
config/.sfdx-hardis.yml, and a project that wants different behaviour changes that file.
8. Push
The command asks before it pushes: that is the question marked (1) in the picture at step 6.
Answer Yes and the branch goes to your fork (github.com/my-username/sfdx-hardis-training). If you answered No, open the Source Control
panel and click Publish Branch.
What you should see
- The Git Delta package.xml report naming your four components and nothing you did not touch: the field, the layout and the two permission sets
manifest/package.xmlgaining one line, the new field, in a commit the tool made- Your branch on GitHub, in your fork (
github.com/my-username/sfdx-hardis-training), under Branches - The DevOps Pipeline panel showing your branch feeding
integration, with no Pull Request yet
If it goes wrong
Recent Changes lists things I never touched. Normal on any org: the deployment Lab 1.2 made into this org counts as a change too, and so does Salesforce's own internal churn. Tick only your four. The Last Updated Date column is the fastest way to tell: sort on it, and yours are on top.
The retrieve fails with "Failed to retrieve metadata due to source conflicts". A scratch org keeps track of what it last exchanged with your project. When the files on your machine changed behind its back, after Reset this level or a branch you threw away, it refuses to overwrite them without asking. Click I don't care, overwrite!: what you want is the org's version, and git still shows you the diff before anything is committed.
Recent Changes finds nothing at all.
You are looking at the wrong org. Check the selector at the top right reads helios-dev, and that
the Status section of the sfdx-hardis panel agrees.
manifest/package.xml is empty.
You have no commit on this branch, so there is no difference for it to describe. Go back to step 4:
retrieving writes files, committing is what puts them on the branch.
A file you did not touch shows deletions you do not understand. That is the automated cleaning doing its job, and Profiles are where you meet it most. Read the cleaning rules in the Under the hood block above. Nothing is lost in your org: cleaning changes what is committed, never what is in Salesforce.
Push is rejected.
Your fork (github.com/my-username/sfdx-hardis-training) moved, usually because you reset a level. Pull first: Source Control panel, ... menu,
Pull.
Check your work
Welcome page > Training: Level 1 > Check my work, then pick Lab 1.5.
It reads the copy of your branch in your fork (github.com/my-username/sfdx-hardis-training), the one Save / Publish pushed: the field, the
permission set granting it, and the layout carrying it. A commit that stayed on your machine does
not count, because nobody else can see it.
Go deeper
Next: Lab 1.6 - Open a Pull Request, pass the deployment check, merge