Lab 1.3 - Start a User Story on its own Git branch
Level: 1 Contributor basics
Time: ~10 min
You will: pick up your first ticket and land on a clean branch, pointed at your dev org.
The situation
The backlog is in BACKLOG.md. Your first story is at the top:
US-014 - Show the crew how many panels a job needs
As a delivery crew member, I want to see the number of panels required on the installation record, so that I load the right quantity on the van.
Acceptance criteria:
- A Panels Required field exists on Installation
- It is visible to the crew permission set
- Planners can fill it in
- It appears on the Installation record page
Small on purpose. What matters in this lab is not the field, it is the loop you are about to learn and repeat for the rest of your career on this project.
Branch, in one sentence
A branch is a named line of work inside the repository. Yours starts as an exact copy of what the team has right now. You change what your story needs on it, and the team's version stays as it was until your Pull Request merges yours back in, which is how two people work on two stories at once without stepping on each other. The extension creates the branch, switches you onto it and later pushes it, so you never type a Git command.
Before you start
- Lab 1.2 finished: your fork (your own copy of the course repository on GitHub, for example
github.com/my-username/sfdx-hardis-training) is cloned, andintegrationanduatname their orgs -
helios-devlisted as Connected in Orgs Manager
Steps
1. Start the User Story
On the Welcome page, open the DevOps Pipeline panel and scroll past the diagram to the Project Contribution Workflow (1). Click the New User Story card (2).
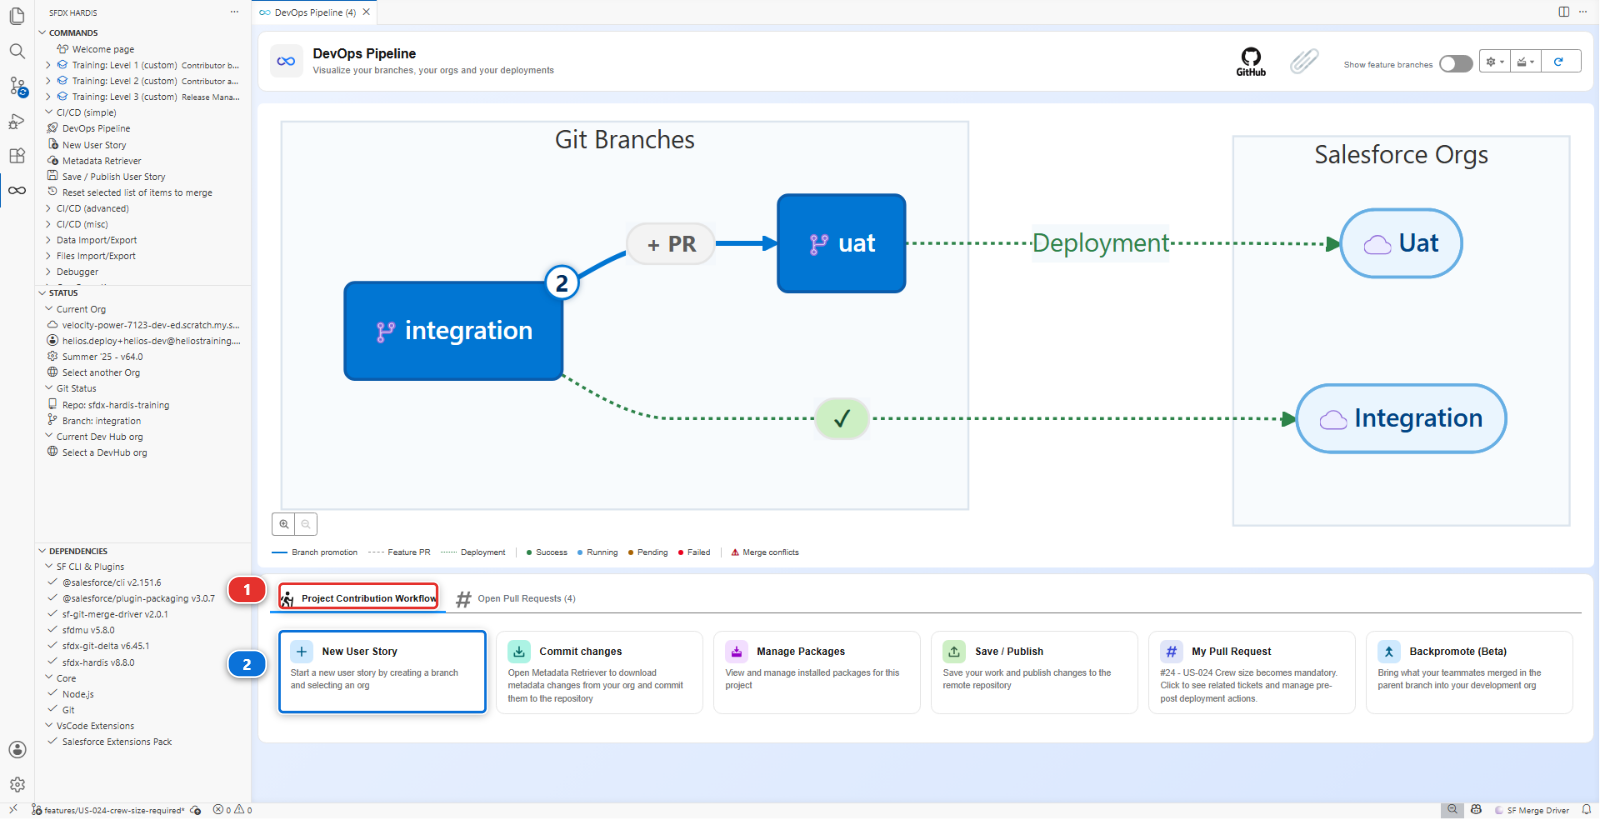
Cannot see the cards?
They sit under the branch diagram. Scroll down in the panel.
The extension asks four questions, one screen at a time. Each one appears in its own panel, and every answer you give stays visible above the next question, so you can always see what you told it. Before the first one, it tells you something instead of asking.
2. Where the work is going
The first line under the header reads Automatically selected target branch is integration
(1). It is not a question, because there is nothing to choose: this project declares
integration as the only branch a contributor may target, in availableTargetBranches. Lab 3.1
adds preprod, where urgent fixes start, and from then on the command asks, offering both.
Under that line, the first real question already waits, with its two answers (2) and (3):
the next step is about them.
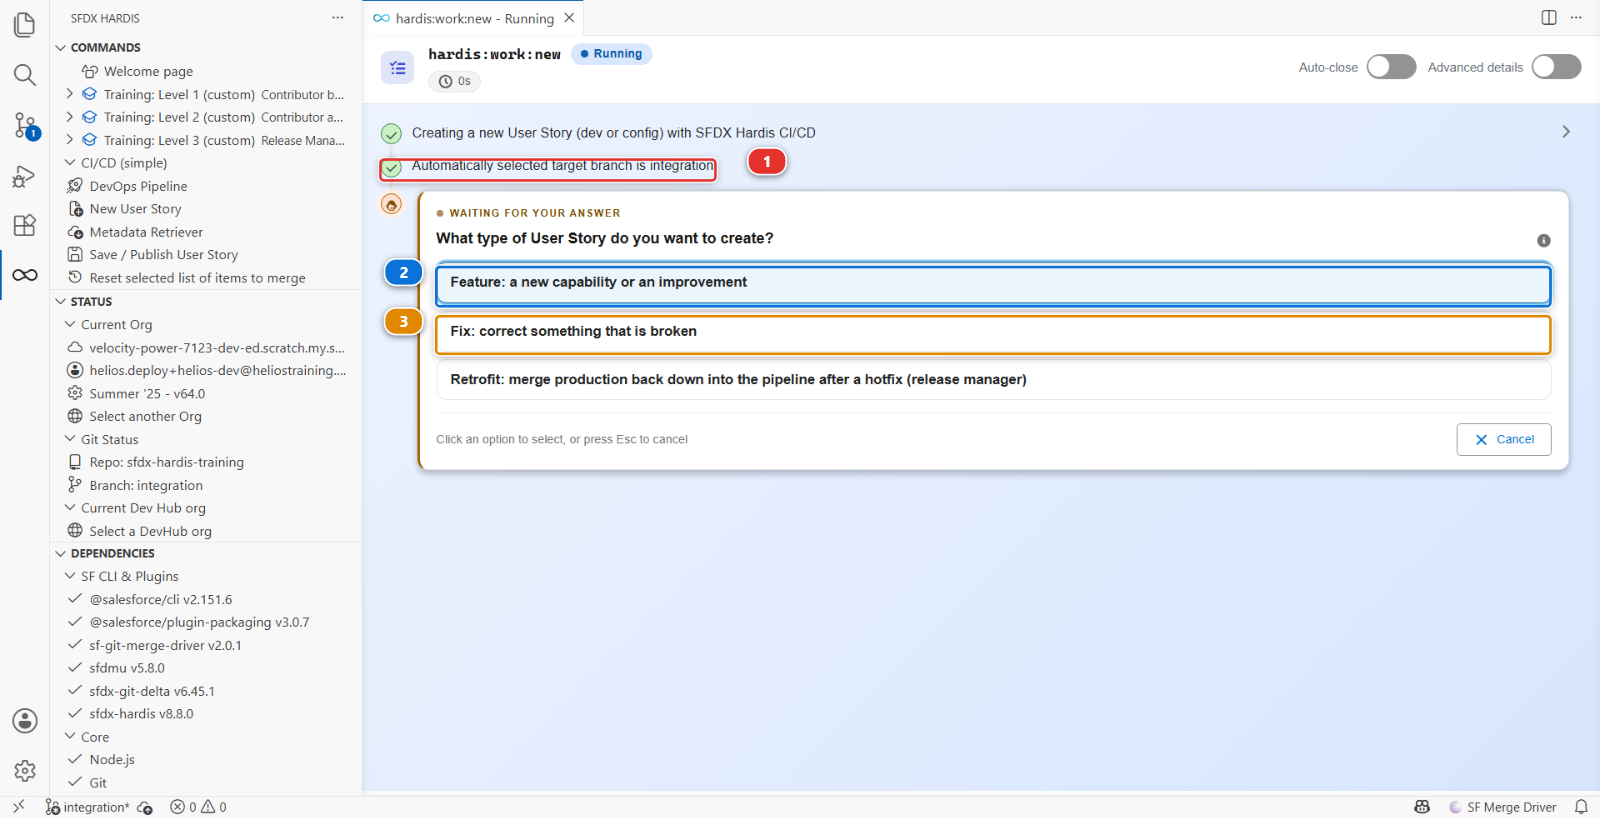
You never guess where your work is going: the command says it first, writes it down, and every later step reads it back.
3. What kind of work it is
What type of User Story do you want to create? Take Feature: a new capability or an
improvement (2): US-014 adds something that was not there. Fix: correct something that is
broken (3) is for correcting something already delivered. Both answers are worded by this
project, in branchPrefixChoices.
The answer becomes the first part of your branch name, features/ or fix/, so anybody looking
at the list of branches can see at a glance what kind of work is in flight.
4. What to call it
What is the name of your new User Story? Type it in the box (1) and click Validate (2):
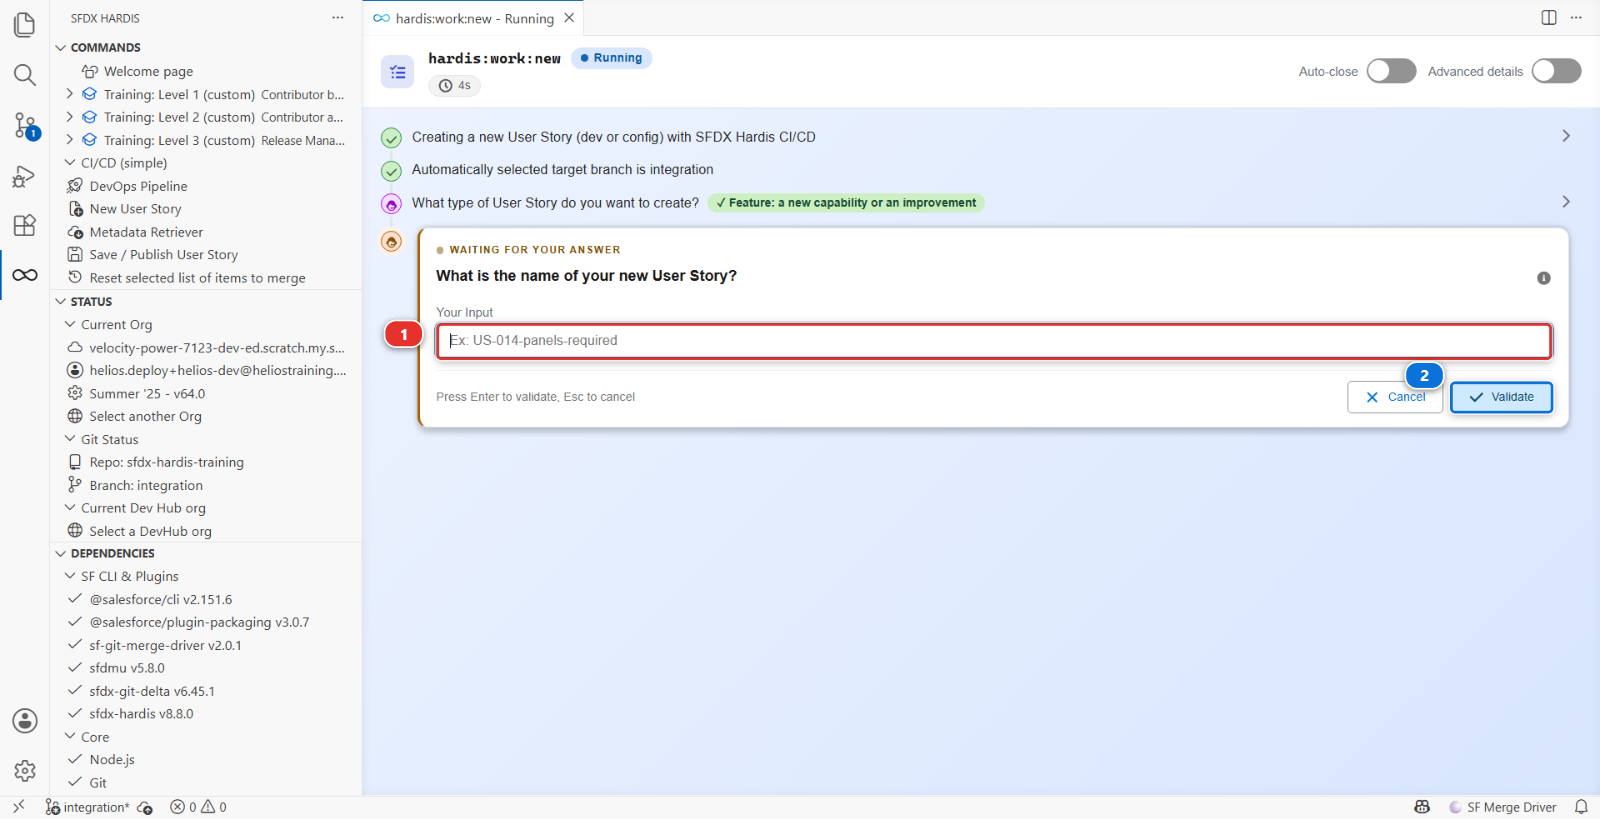
The greyed-out example inside the box is not decoration: this project declares a pattern that names
have to match, and the example is a name that matches it. Type something else, Panels Required
say, and the command tells you what it expected and asks again.
5. Which org you will build in
Which Salesforce org do you want to work in? Take Scratch org (1): helios-dev is one,
created in Lab 1.2.
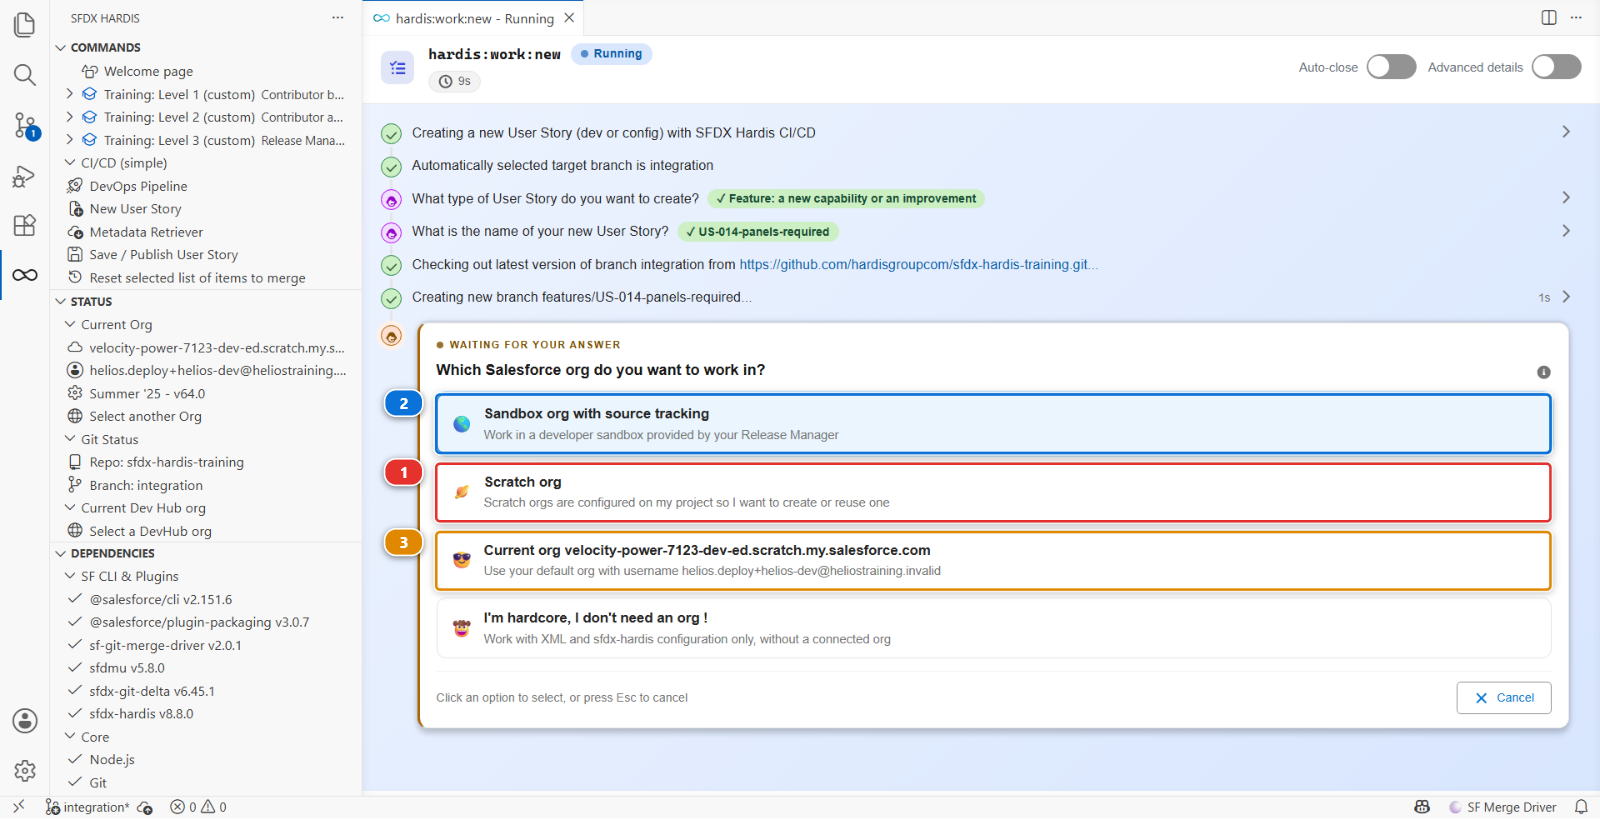
The other answers are for other projects. Sandbox org with source tracking (2) is what most
teams use, a developer sandbox the release manager hands out. Source tracking means the org keeps a
running note of what changed in it since you last synchronised, which saves you looking. Current
org (3) names whatever org your project points at, by its address: it is helios-dev today, but an
address tells you nothing, so do not rely on it. The last answer is for editing the project's files
directly, with no org at all.
Then the list of orgs it could attach. Take Reuse scratch org helios-dev (1).
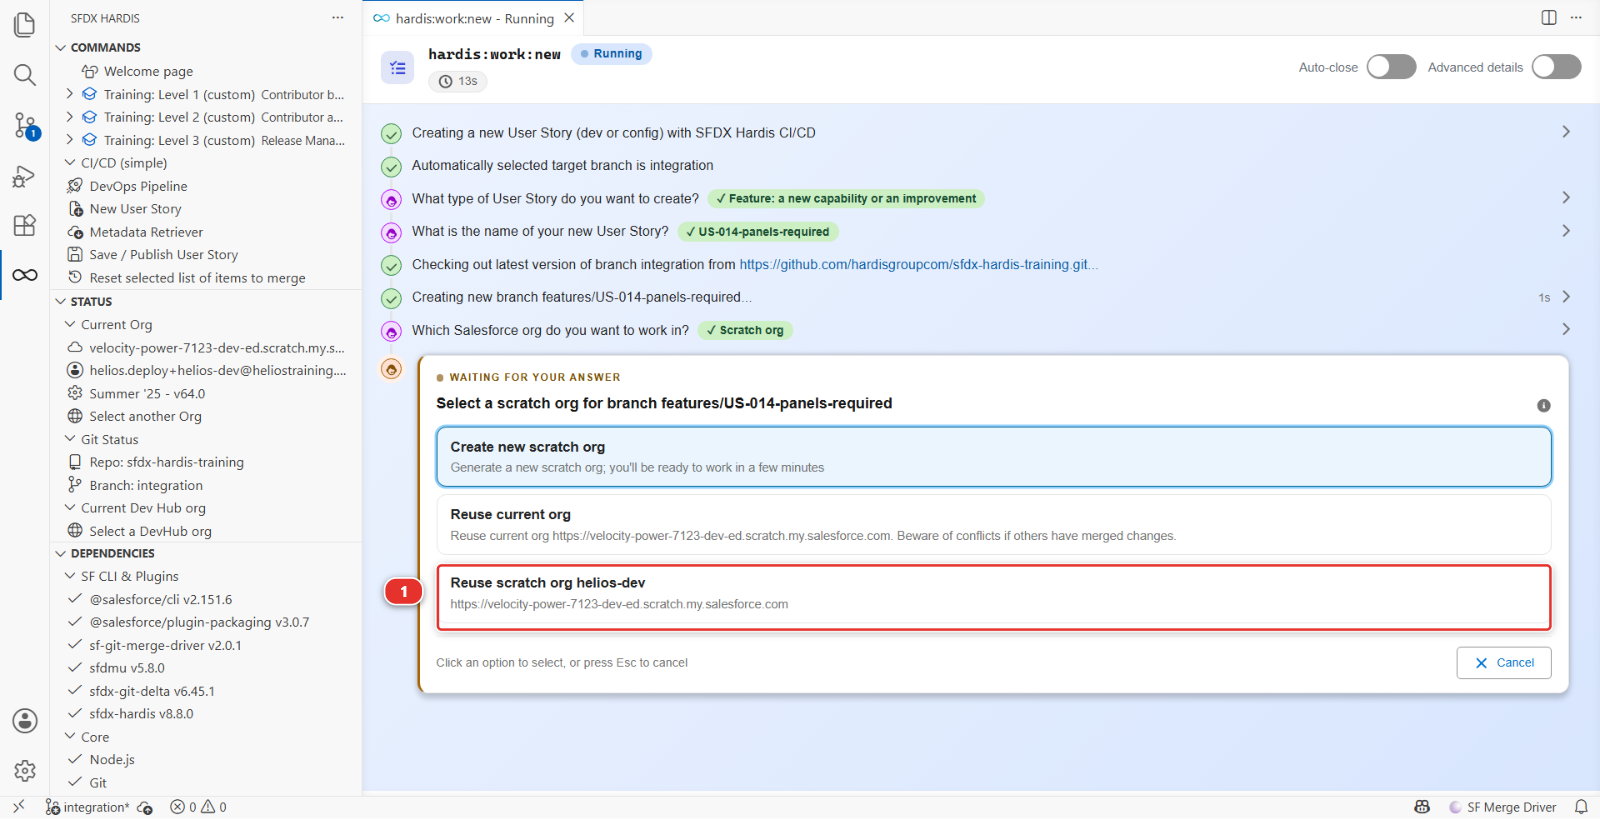
This is the org Lab 1.2 filled with the Helios app, and the one you are about to change by hand in
Setup. The list does not offer helios-integration or helios-uat: the command knows those two
belong to major branches, and building directly in a shared org is exactly what this whole way of
working exists to stop.
The middle answer, Reuse current org, would land on the same org here, by its address rather than by its name. Take the named one: an address tells you nothing about which org it is.
Never take Create new scratch org here
It is the first answer, and on a real project it is often the right one. Here it would ask your Dev Hub for a fourth scratch org, and a Developer Edition Dev Hub keeps only three alive: the command fails after a long wait, with nothing to show for it.
6. Read what it tells you at the end
The command opens helios-dev in your browser: you can leave that tab for Lab 1.4. Then it finishes
and prints what it did. Read it rather than closing it.
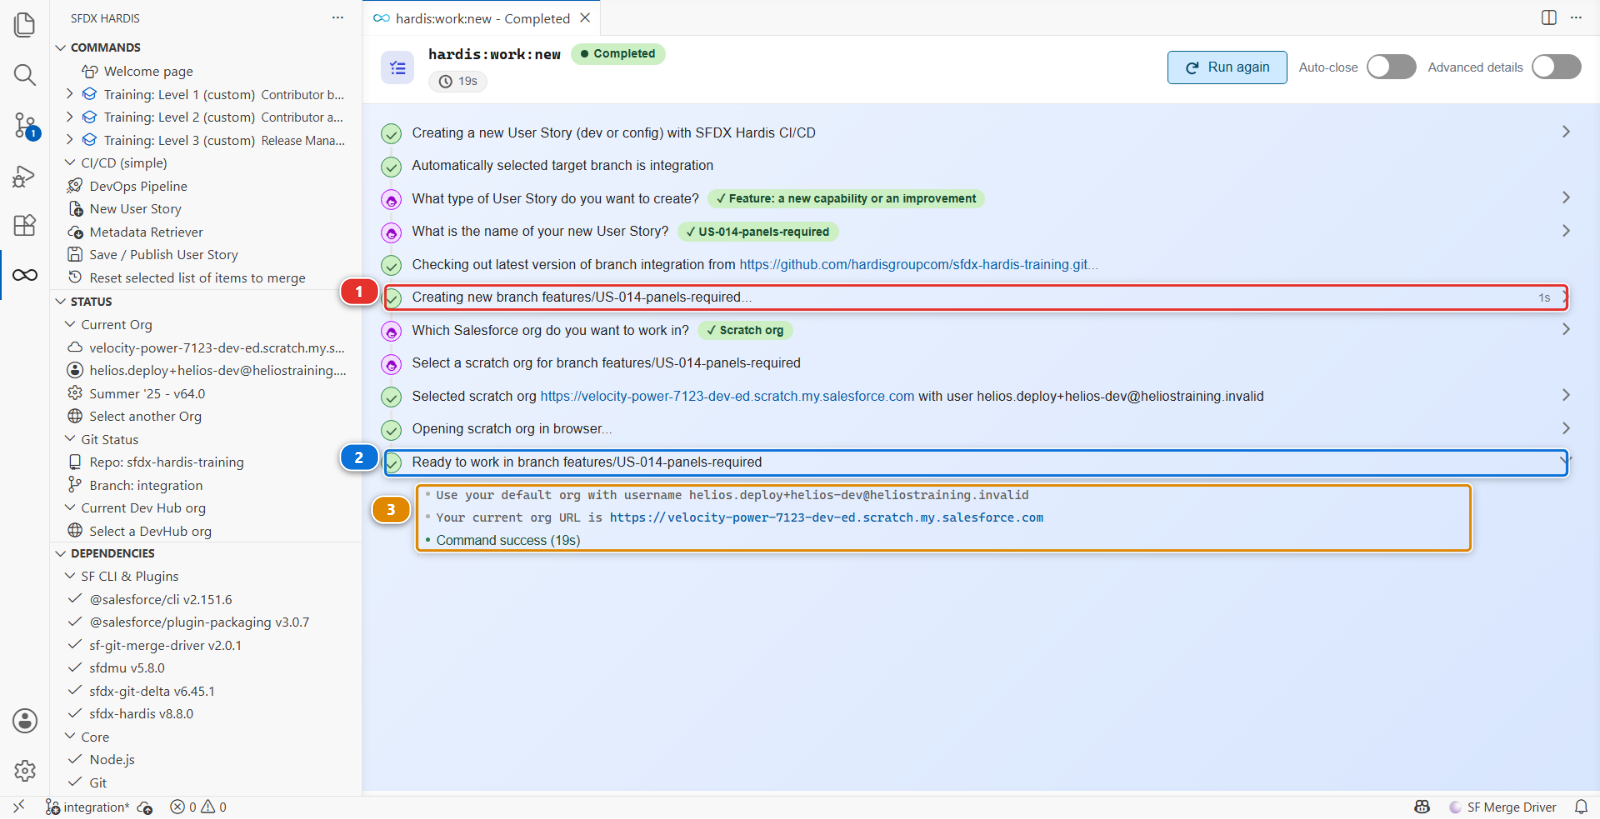
- the branch it created and checked out (1)
- the confirmation that you are ready to work on it (2)
- the org it attached to this User Story, by username and URL (3)
Those three lines are worth a glance every time. A branch name that is not the one you expected, or an org that is not the one you meant, is a problem that costs thirty seconds now and an afternoon later.
Under the hood: what "New User Story" just did
The panel ran:
sf hardis:work:new
which did six things, in order:
- Picked the target branch. With a single entry in
availableTargetBranchesit takes that one without asking; with several it asks, and it remembers the answer for this branch - Fetched and updated the target branch.
git fetch, thengit checkout integrationandgit pull, so your branch starts from what the team has now rather than from whatever you had last week. This is the step people skip by hand and regret a week later - Created the branch, named from your answers:
git checkout -b features/US-014-panels-required - Wrote your user configuration in
config/user/.sfdx-hardis.<your-username>.yml, recording the org for this User Story. That file is git-ignored: it is yours, nobody else needs it - Selected the org as the default target for the following commands
- Opened the org in your browser, since you are about to work in it
The list of scratch orgs is the ones your default Dev Hub created, which Lab 1.2 set to helios-prod,
minus the ones named in config/branches/. Nothing here brings what is on integration into your
org: that is a backpromote, and Level 2 starts with one.
The branch prefix features/ and the name pattern come from config/.sfdx-hardis.yml:
branchPrefixChoices:
  - value: features
    title: "Feature: a new capability or an improvement"
  - value: fix
    title: "Fix: correct something that is broken"
newTaskNameRegex: '^US-\d{3}-[a-z0-9-]+$'
Change those two settings and every contributor gets different prompts. That is how a project enforces a convention without anybody having to remember it.
What you should see
Three things, all visible without leaving VS Code:
- Bottom left of the status bar: the branch is now
features/US-014-panels-required - The sfdx-hardis panel, Status section: Current Org is your
helios-devorg - The DevOps Pipeline panel: your new branch appears as a small box feeding
integration
If any of the three disagrees with the others, stop and fix it now rather than after you have built something.
If it goes wrong
The command refuses the name.
The pattern this project uses is US-014-panels-required: three digits, then lowercase words
separated by hyphens. US14-PanelsRequired is rejected on purpose.
A file you were editing has disappeared.
You changed something before starting, and hardis:work:new never carries stray work onto a fresh
branch: it puts it aside in a stash, and says so in its panel, naming the files. To get them back
on the new branch: Source Control panel, the ... menu at the top, Stash, then Pop
Latest Stash.
The org list does not show helios-dev.
The scratch org expired: they live 30 days. Click Training: Level 1 > Set up my training
environment again. It creates a new helios-dev with the Helios app, and leaves everything else
as it is.
It fails with a message about the scratch org limit. You took Create new scratch org. Nothing was created and nothing is broken: start the User Story again and take Reuse scratch org helios-dev.
Check your work
Welcome page > Training: Level 1 > Check my work, then pick Lab 1.3.
It looks for your story branch, features/US-014-..., the one thing this lab leaves behind. Your
work has not reached integration yet, and nothing here expects it to: that is Lab 1.6.
Go deeper
Next: Lab 1.4 - Build a custom field in your Salesforce org